A child's birthday is a special holiday that should take place in an atmosphere of joy and fun.
Balloons, garlands and various inscriptions hung in the room will charge the birthday person with positivity and happiness from the very morning.
Buying jewelry is not difficult, but not everyone can afford it. It is much more profitable and interesting to create beauty with your own hands.
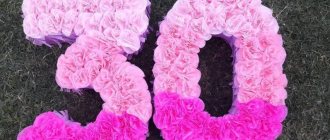
A number corresponding to the age of the birthday person is an original way to transform a room and delight the little creature.
Making numbers
Most often, small balls are used to create such decorations. But not everyone can make an air number for their birthday on their own.
There are other, no less beautiful options:
From cardboard
You will need a large (or not so large) unnecessary box. On it you should draw a beautiful number corresponding to the child’s age, and then cut it out.
Next, the cardboard base needs to be decorated: painted with paints, covered with bright scraps of fabric or wrapped with floral film.
Counters
Fountains can be rolled using fabric, paper or using flower packaging film. To do this, the material must be cut into equal squares. Each of the squares must be folded in half, but unevenly, and then in half again and again unevenly. So that all the edges stick out in different directions. After this, the pound is fastened at its base with a stapler and glued to the product.
This simple and uncomplicated method is suitable for any occasion - a wedding, New Year or birthday. After all, the pounds lie on the base and make the number or letter from cardboard truly bright, elegant and voluminous.
From photographs
A kind of collage made on a cardboard figure.
Photo cards should be selected in advance and arranged according to the desired pattern.
From flowers
The cardboard blank must be pasted over with many flowers made from colored or corrugated paper.
The decorations should be laid out closer to each other, and in this way fill the entire base with them.
Creating fringe for decoration
Another original decoration for any number will be the use of fringe. In fact, fringe made from corrugated paper is the easiest and fastest way to decorate any decorative element for Christmas or any other holiday.
You just need to cut the paper into wide and fairly long strips. After this, each strip is folded into a rectangle and cut into fringe.
All that remains is to straighten and glue such a decorative element to the figure, as in the photo, numbers made of corrugated paper of any color. To do this, you can use glue or double-sided tape.
From buttons
If you have a large number of buttons, you can paste them over a cardboard base.
Volumetric figures
If there is still time before the name day, then you can make a three-dimensional birthday figure with your own hands, which the baby can play with and move around the room.
The same cardboard is used as the basis, only this time you will need two identical parts. In addition to them, you need to prepare several cardboard strips of the desired width - these are the sides of future beauty.
You can assemble the number using masking tape or tape: to do this, glue the parts to each other one by one.
Making frames for large numbers for a birthday with your own hands
The first thing to start with is making a frame. It is usually made of thick cardboard, which will not bend or break during subsequent decoration. Then you should decide on the size of the future figure. If you plan to make a figure within the size of an A4 sheet, feel free to search for the desired figure on the Internet and print it out.
If you want it to be larger than A4 size, you need to do the following:
- Find a high-resolution image on the Internet;
- Print the picture on two/three (depending on size) A4 sheets on a printer;
- Carefully cut out each part;
- Connect all parts end-to-end, secure with tape;
- The resulting number template should be attached to a previously prepared sheet of cardboard of the required size and traced along the contour;
- Next, you need to cut out a number along the resulting contour;
- If the birthday person is over 9 years old, this procedure should also be repeated with the second digit. For example, if a child turns 10 years old, you need to cut out the numbers 1 and 0.
Thus, the frame of the flat figure is complete. You can go further and make a volumetric figure. To do this, you need to perform a few additional steps:
- After tracing the stencil and cutting out the 1st part of the product (front), you need to perform these steps again, obtaining a similar 2nd figure (back).
- Next, we cut out the 3rd figure, placing it in the end part of the product (forming volume). The width of the tape corresponds to the width of the future figure. And the length should be equal to the perimeter of the figure (it’s better to take it with a reserve). For numbers with closed internal spaces (0, 6, 8, 9), you will have to cut additional side parts of the required width.
- Afterwards, you should connect the three parts of the figure (the back and front numbers are located on the sides, the end tape is in the middle), fasten them with tape. It is better to use enough tape so that the product does not fall apart during decoration.
Important advice: The easiest way (if the width of the cardboard allows) is to cut out one long ribbon that will encircle the number in the end area, bending at the corners. This is much more convenient than cutting out separate pieces for each fold and fastening them together.
If you don’t want to glue anything together, you can use polystyrene foam or foam rubber as a base. In this case, you need to take a solid piece of foam plastic (foam rubber) of the required width (corresponding to the width of the finished figure), attach a number stencil, trace it, and cut it along the contour. Thus, you get a volumetric figure. You can use scissors to cut the foam. The foam will have to be cut with a sharp knife.
From napkins
To create a “fluffy” figure, in addition to napkins, you will need a lot of patience. But this is nothing compared to how happy the little birthday boy will be.
The process of creating a decoration is quite simple: a napkin (single-layer) must be folded in four and cut - you should get four squares. They should be stacked on top of each other and secured in the center. Wire, stapler or thread can help with this.
The sharp parts of the resulting part need to be cut off so that the final result is a circle. Then cut through the edges without touching the central part. All that remains is to lift and straighten the petals.
Note!
Crafts for the home made of fabric: we sew toys and decorations with our own hands (98 photos + video)- What crafts can you make from boxes with your own hands? 79 photos of great solutions for children
- Crafts from newspaper tubes: step-by-step instructions for the weaving process. 105 photos of newspaper crafts!
This creates one flower. To cover the figure completely, you will need quite a lot of them. Having prepared the required amount, you need to glue the flowers to the base, filling the entire space with them.
Corrugated paper
A large birthday number decorated in this way will turn out simply incomparable.
In order to create beauty you will need a large amount of corrugated paper. It would be better if it were multi-colored. You should cut the paper into strips of half a meter.
The optimal width is 3.5 cm. At this stage, you need to monitor the veins on the paper: they should be directed along the future flower.
Then you should stretch the strip on one side. Hold the workpiece in waves upward and, grabbing the base, wrap it around its axis. Secure the bottom of the flower with thread or wire. Spread the petals of the resulting rose.
Note!
- Crafts for beginners: tips and ideas from a guru on creating beautiful things with your own hands (96 photos)
- Children's crafts: inspiring ideas for hobbies and hobbies for all ages + 56 photos
- How to make beautiful simple crafts with your own hands - step-by-step instructions for beginners + 62 photos
Cover the cardboard frame with flowers. For convenience, you can use a glue gun.
Number in winter style
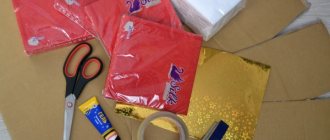
For work we will prepare:
- cardboard;
- corrugated paper in several shades;
- stationery knife;
- pencil;
- scissors;
- scotch;
- plain printing paper;
- glue in a gun;
- rhinestone ribbon;
- watercolor paints and brush;
- decorative snowflakes.
Draw a number of the required size on the cardboard and cut it out with a stationery knife. We make two identical blanks.
We cut out strips of cardboard of the required width to make the figure three-dimensional.
Carefully glue them with tape to one of the sides. We place a second blank in the form of a number on top and glue it with tape.
We cut strips of corrugated paper of different shades.
Cut them into small pieces, as shown in the photo.
We cut white printing paper into strips and paste over the number.
Glue pieces of white corrugated paper along the edges.
Fill the middle tightly with two colors.
To give a winter style to the figure, we apply a little white and blue watercolor paint.
Glue decorative snowflakes on top of the corrugated paper.