For a children's birthday party or photo shoot, you need props. Napkin numbers have become popular and can be seen at children's birthday parties. Indeed, this kind of decoration at a holiday is beyond competition. They are light, and children can play with them, inexpensive, beautiful and evoke only pleasant emotions.
An original composition of napkins in the form of numbers requires a creative approach. Although their production takes more than one hour, the emotions of the happy birthday boy who received such a number are worth all the time and effort.
See how to make a number, how to decorate it, what materials are needed, and try to make decor from napkins with your own hands using our master classes.
How to decorate a number from napkins
Now that you know how to make a blank for a number, let's try to figure out what and how to decorate it?
It must be said that not only napkins are used for decoration, but also any thin paper - tissue paper, corrugated paper, paper. Choose colors accordingly: soft ones for girls (lilac, pink, white, blue) and bright colors for boys (blue, red, light green).
You can decorate a number from napkins with your own hands in different ways:
- flowers;
- using the “facing” technique;
- fringe;
- make a figurine figure.
Let's learn how to make decor for numbers.
Examples of using
Here are a few examples of how you can use these numbers from cardboard and napkins. We think that such beautiful pictures will definitely motivate you to create such decor according to our recommendations.
Child's birthday:
One year old photo session:
Anniversary/Anniversary:
Decorations for photo sessions - photo zone:
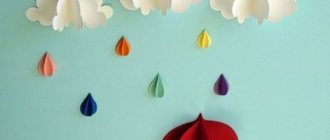
Flowers from napkins
For a large figurine, decorated on all sides, you will have to make about 200-400 small roses. The most common decor is flowers. They are suitable for both boys and girls. Flowers should be fluffy and easy to pick. After all, you will need more than one flower. You can save time by covering the sides of the figure with corrugated paper or paper. Then you won't have to sit on the decor for several days.
Before attaching corrugated flowers, it is better to create a tone for them using corrugated paper
Well, choose the options for those flowers that turn out the most lush: asters or roses.
For a lush aster from napkins, take:
- 3 napkins;
- scissors;
- threads;
- fold the napkins like an accordion;
- wrap the middle with threads to make a bow;
- straighten the petals towards the center, moving towards the edges. Make a bud in the middle by squeezing the paper tightly; Spread the lower leaves to create a convenient area for gluing.
For a rose you need to take 6 napkins and a stapler.
- Fold the napkins into a stack.
- Cut out the petals (several semicircles).
- Unfold the rose, moving the petals.
- We fasten the tip with a corner.
- Let's fluff the flower.
Try making the edge of the flowers wavy by making a zigzag with scissors. A flower with teeth on the edges looks more interesting.
Combine colors. Use napkins of different colors for one flower. You can draw a line along the edge of the napkin with a felt-tip pen.
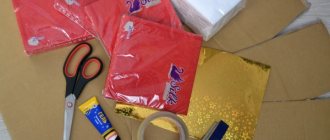
Necessary materials
I decided to present the necessary materials in the form of a list:
- The basis. Pay special attention to her. The most common types for its creation are cardboard boxes and polystyrene foam. The boxes can be used both for large household appliances and small ones for juice, etc. The larger the desired number size, the larger the box.
- Napkins. A few packs will come in handy. You can use other types of paper, such as corrugated paper.
- Glue or skewers for attaching flowers and other decorations to the base.
- Scissors or utility knife. The latter is especially relevant for cutting foam plastic.
- Double-sided and paper tape. For polystyrene foam you will need the first one, and for cardboard you will need the second one.
Trimming
Numbers decorated using the cutting technique turn out to be very fluffy. It’s better to use corrugated paper, but plain napkins also work well.
- The paper is cut into squares.
- Then you place a pencil in the middle of the sheet and press it with paper.
- We apply a stick with paper to the surface coated with glue.
- Having filled the entire surface in this way, straighten the decor with your hands and trim off the excess with scissors.
Trimming method
Volumetric numbers using the cutting method look fluffy and soft
You can also make flowers by trimming.
To do this, prepare:
- plasticine;
- several rectangular sheets of paper;
- trimming stick.
Now let's get started:
- Knead the plasticine.
- Wrap the stick with paper so that most of it remains free.
- Stick it into a piece of plasticine.
- Make 3 petals in the same way.
- Fill the space between them with petals of a different color.
- Cover the middle where the plasticine is visible with a piece of crumpled paper.
Foam blanks are the most suitable for trimming. No glue is needed, the stick pierces the soft material, and the trim remains in it. You can trim the patterns inside the figure and decorate the decor with several diagonal stripes of different colors.
Send your photos
Do you also make beautiful crafts?
Send photos of your work. We will publish the best photos and send you a certificate of participation in the competition. Rules and form on this page. Tags: Birthday
Attention! It is better to write urgent questions in the comments on the website (form at the bottom of the page) or, better yet, directly by email. There are no notifications about comments from the VKontakte form! This form is more for feedback. 
Discussion: there is 1 comment
- Zhenya:
September 18, 2021 at 9:16 amWell described, everything is clear. True, we need the number 5, but the technology is the same. Let's make this birthday craft with our own hands - cheap and cheerful)
Answer
Numbers - figures
Based on a simple number, make a character from a children's cartoon, such as Mickey Mouse.
- Cover the number itself using the trimming technique with red and black napkins.
- Add white paper circles.
- Cut out 2 circles from black cardboard and attach them to the top of the number.
You can style the number in this way to match any favorite cartoon character. Use a suitable color, add details from other materials.
Volumetric figures can be stylized as animals: unicorn, bear, bunny, swan and others
Now that you have learned how to decorate a decorative composition, let’s take a closer look at how to make a number from napkins with your own hands.
Frame making
So, let's start making the frame of the numbers. The figures consist of rectangles, circles of different diameters, and semi-ovals. Since our figure is three-dimensional, individual elements end at the ends. The ends are square in shape. The execution of individual parts for different numbers has its own characteristics, let’s figure it out:
Digit 1
This is the most popular number! Celebrating the first year of a baby's life is the most awaited event. This figure consists only of rectangles, but more details are needed than for others.
Number 1 pattern:
Let's start with the right side rectangle, take measurements from the top of the figure to the base (the crossbar at the bottom of the figure). Secure with tape. We measure the left segment of the rectangle from the curved part to the crossbar. We decorate the upper part of the crossbar; you will need two rectangles. Cut out a rectangle for the bottom and fasten it together. We cover the ends of the figure with squares, you need 4 of them. For the arched upper part, shallow cuts can be made on the inside of the cardboard to make the cardboard more pliable.
Watch the video master class on making a unit:
Digit 2
Unlike the one, the two has smooth curves, so making a cardboard base for the number will be a little more difficult.
Number 2 patterns:
To create a semi-oval figure, cut off a long strip, connect it to the upper semi-oval of the figure, and do the same with the inner one. To make the “tail”, it’s easier to make it straight, prepare rectangles for the top and bottom. Using 3 end squares we complete the production of the figure.
Watch the video master class on making twos:
Digit 3
Does the holiday date consist of the number 3? It will take even more effort.
Patterns for number 3:
For two outer semi-ovals: the top (smaller size) and the bottom (larger size), it is necessary to cut two long rectangular strips, also for the outer one, having previously measured these segments. Glue a rectangle to the bottom of the outer semi-oval - the bottom and squares to the 3 ends of the figure.
Watch the master class on how to make the number 3:
Digit 4
Four is similar to one. Start of making a figure as for a unit, i.e. on the right side of the main rectangle.
Number 4 pattern:
We make a blank for the left side of the oblique segment. Together with the crossbar, they can be shaped like an angle or have a square end. Next, according to the measurements, we cut off rectangles for the upper and lower parts of the crossbar. To form the internal corner, prepare three segments of appropriate sizes. It is advisable to weight the bottom of this figure, for example, with a wooden block for stability. Attach the block to the inside of the bottom in advance.
Watch the video on how to make a four with your own hands:
Number 5
For number 5, choose a template with straighter lines to make it easier to cut and connect the elements.
Templates for 5:
First of all, let's design the top part by measuring the required length on cardboard, cutting out and attaching rectangles at the top and bottom. Prepare 2 long rectangles for the outer and inner semi-ovals. The bottom is a rectangle 20 cm long on the bottom of the semi-oval. It remains to close the ends, there will be 4 of them.
Watch the video master class on how to make a frame for the number 5 from cardboard:
Number 6
It consists of a large outer circle and a small inner one, as well as 2 semi-ovals: outer and inner.
Number 6 patterns:
We form the bottom at the bottom of the large circle. We measure the lengths of the semi-oval segments and cut off the strips of the required length. We fasten with tape. Similarly, we take measurements of the inner circle, cut off a rectangle and connect the parts. We close the end of the upper semi-oval with a square.
Number 7
The easiest number to perform! But you will have to think about how to reliably put this figure vertically.
Patterns for number 7:
It is better to make the rectangle of the number 7 template curved and strengthen the bottom, again with wooden blocks, or make the bottom from several layers of cardboard glued together. Next, cut out 1 end square, the bottom, two rectangles for the top element and two long rectangles for the curved parts.
Number 8
Probably, more often this figure is used to decorate premises for the celebration of Women's Day.
Templates for 8:
The figure eight consists of 2 circles: large and small. Having previously measured them, we prepare 2 long rectangles for the two inner circles. The outer circles can be connected by a long rectangular strip or you can assemble the side of the number from several short ones, gluing them together.
Watch the master class on how to make the number 8 from cardboard and napkins:
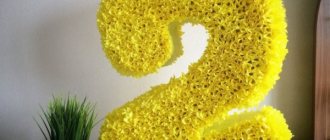
Number 9
The number nine is performed similarly to the number 6. Remember that the bottom of the figure will be on the lower semi-oval, and the bottom of the six will be on the lower circle!
Pattern 9:
Digit 0
This figure “loves” round dates!
Stencil for number 0:
We prepare one large oval circle and two long rectangular strips for the curved sidewalls: outer and inner. We measure 20 cm at the bottom for the bottom.
Watch the video on how to make the number 0:
Master class cardboard figure
Let's make a small volumetric figure from packaging corrugated cardboard.
To do this, take:
- 10 sheets of cardboard;
- glue gun;
- breadboard knife;
- 6 packs of tissues.
Progress:
- Make a number template and transfer it to sheets of cardboard.
- Using a breadboard knife, cut out 10 identical parts.
- Fasten them together with hot glue.
- Make roses from napkins.
- To do this, staple several napkins, cut out a circle, and straighten them to form a flower.
- Glue the roses to the number with hot glue.
A volumetric figure can be made from sheets of corrugated cardboard that are glued to each other
The result is a light and strong figure that will withstand the most active photo shoot. But there are other ways to make numbers from napkins: see the master class below.
First birthday number
For this composition we will make a cardboard base that is hollow inside.
If a unit is easy to build on paper and cut out, then how to calculate the length of the sides? You can do everything by eye, or you can use a mathematical formula:
P = 2(a + b) ,
where a and b are the sides of the figure.
Make some extra space for gluing the parts together.
So, what is the number 1 from napkins made of:
- double corrugated cardboard;
- napkins;
- hot glue;
- masking tape;
- scissors and breadboard knife;
- stapler
- Cut out a number from the template. Transfer to cardboard, cut out 2 parts.
- Calculate the length of the sides of the figure and cut out the sides.
- The figure may expand downwards. Then the sides will look like a trapezoid.
- Secure the pieces together using masking tape. Secure them from the inside with hot glue. Attach the second part of the unit and secure with masking tape.
- The inner part should be strengthened in advance; install tightly fitting pieces of cardboard into it. They will act as stiffening ribs, and the decor will not bend.
- If desired, cover with napkins.
- Fold roses from napkins.
Volumetric figures in the full height of a child look especially impressive at a photo shoot.
Decorate the number 1 for a year with a large flower made from napkins.
Take a knitting needle, wrap a napkin around it, and remove the tube. Straighten it a little and, fastening the ends with a stapler, make a petal. The center of the flower is one corrugated tube, rolled in a spiral.
These flowers look like they are made from balloons.
Add pompoms and a congratulatory garland to the figure set.
Number 2 from napkins: master class
For this photo shoot we will use several techniques. We will make the background by trimming, add a few roses and make a crown.
- The basis of the figure is polystyrene foam 10 cm wide.
- You can cut 2 pieces of 5 cm each and fasten them with hot glue.
- For decoration - 30 flowers from napkins, large pearl beads.
- Yellow or gold cardboard for the crown.
- Additionally: double-sided tape, knife, pencil, scissors.
Do-it-yourself volumetric figure with a crown
Work progress:
- We transfer the pattern of the two to the foam. Cut with a knife.
- We cut the napkins into squares. Wrapping the tip of a pencil, we transfer them to the workpiece and secure it to the foam.
- We straighten the pile and trim it. We cover the side parts with corrugated paper or trim them.
- We make roses from napkins and attach them with hot glue.
- Glue the pearls.
- We cut out a strip of gold paper, make teeth, roll it into a ring, and secure it with tape.
- Glue the crown to the number with a glue gun.
It made a great gift for a little princess. For transportation or storage, wrap the figure in plastic.
Decor figures
Let's proceed to the second stage. You can decorate the resulting figure using different materials and methods, it all depends on your preferences.
We will decorate with flower buds from simple paper napkins. These could be carnations, chrysanthemums, roses or, for example, pompoms. The technique for performing them is simple, but it will take some time:
Carnation
1 way
- for a large flower, without unfolding it, fasten the napkin in the middle with a stapler; for a small flower, fold it in four;
- Using scissors, we cut out the petals of the future flower, rounding the edges of the resulting square;
- Place a pencil in the middle of the square and press each layer onto it separately, holding all the raised petals with your fingers.
To make the flowers the same size, we use a round cardboard stencil.
Watch the video on how to make carnations from napkins:
Method 2
- Using your hands, tear the napkin into 4 parts along the folds (the torn ends will look like natural petals);
- stack the squares evenly on top of each other;
- make an accordion out of them;
- in the center, pull the accordion with thread;
- lift the edges one at a time.
Chrysanthemum
- cut the napkin along the folds into 4 squares;
- from 4 squares stacked on top of each other we make an accordion;
- fasten in the center with thread;
- round the edges of the accordion with scissors;
- straighten the petals, starting from the top layer.
Watch the video on how to make such a flower:
Rose
1 way
- straighten the napkin and fold it diagonally several times (3-4 times);
- from the resulting strip we form a bud;
- fasten one side with thread;
- We straighten the other side, rounding the petals like a rose.
Watch the video on how to make roses from napkins:
Method 2
- cut the napkin at the seams;
- bend it in half, cut it again;
- bend it again and cut it again;
- it turned out to be a stack of squares approximately 4 by 4 cm;
- we lay the squares on top of each other in layers of 5-6 pieces, so that the corners look in different directions (reminiscent of a snowflake);
- We put a staple in the middle;
- Carefully lift each layer one after another.
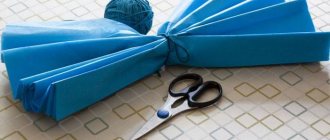
Pom-poms (from napkins of different colors)
The pompom consists of two parts: the base is a large pompom, the middle is a small one.
For a large pompom:
- take, for example, two pink napkins and one white;
- straighten one fold (it turns out to be a rectangle),
- stack the rectangles on top of each other, white on top;
- put everything together like an accordion;
- we pull the middle with threads;
- we form the petals by cutting off the corners of the accordion on both sides, in the center of the resulting trapezoid we cut a corner, it turns out like the English letter “w”;
- straighten the accordion into a circle;
- carefully separate the layers from each other, starting with a white napkin.
Watch the video to see how to make such a pom-pom using single-color napkins as an example: For a small pom-pom:
- fold the unstraightened pink napkin into 4 parts;
- fasten with staples crosswise;
- cut out a circle;
- we make notches about 1 cm apart, not reaching the center of the workpiece by about 1 cm;
- We bend the edges towards the center, holding them at the center with our fingers.
We connect the blanks with glue, a small pompom in the middle of a large one. The pompom is ready, it is quite large. Choose the method of making flowers that you like best.
Glue the decor
And finally, the last stage. We glue the required number of flowers to the product according to a pre-conceived pattern.
The flowers are glued with a smooth transition from one color to another - ombre.
Decor scheme of 3 colors of napkins
Make sure there are no gaps between the flowers! Apply glue in lines as you glue the flowers. Be careful not to remember the buds! Help yourself with a pencil by inserting it into the middle of the flower and pressing it against the frame, or press the flowers with your finger under the petals.
Note that the peculiarity of pasting a figure with pompoms is that there is no need to place them close to each other, and it is better to fill the remaining empty spaces with small pompoms. The product looks original!
Mixing different sizes of flowers looks very natural.
Watch the video on how to glue flowers in a checkerboard pattern onto a glue gun:
Spread the flowers all over your figure to make it look fuller. It's up to you to decorate the sides and back of the figure or not! You can simply cover them with paper to match the colors of the flowers, or vice versa in contrast.
An example of decorating the ends of a number with paper drapery.
Other decorative options for numbers
There are several different ways to decorate such products with your own hands. Choose yours based on the overall design style and available materials. Here are some examples:
- Just paint it with acrylic.
- Cover with multi-colored pieces of paper using the papier-mâché principle or wrapping paper.
- 3D corrugated paper. Watch the video on how to quickly decorate a number with corrugated paper on a glue gun: Second method:
- An interesting option is to decorate with a fringe of corrugated paper, cut into narrow ribbons. Choose the fringe length yourself. You should start from the bottom up. Fold the fringe in two layers so that the base is not visible. Once you have chosen different colors, alternate them as desired.
- You can make pompoms from knitting threads. There are different ways to make pompoms, but the best way is to use two circles of the same diameter, cut out of cardboard. Using a compass, draw two circles, one inside the other, cut out the inner circle. The size of the pompom will depend on the width of the resulting circle. Take a long thread, thread it through a gypsy needle and wrap it around both circles. The splendor of the pompom depends on the amount of thread wound. Using scissors, cut the threads along the outer edge. Slightly spreading the circles, tie the thread in the middle so that the pompom does not fall apart. Remove the templates and straighten the pompom. Pompoms can be selected in different colors and sizes. It all depends on your imagination.
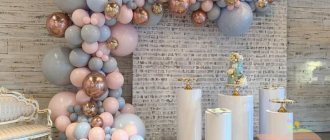
- Balloons:
- If you have a large number of buttons of different colors and sizes, decorate with them! A cool gift for a dressmaker!
- Don't have time to cut flowers out of napkins? Buy ready-made artificial flowers at the store.