How to make paper pompoms with your own hands
There are people who like to decorate their home with such things, and some even build their own business on it, reaping financial benefits. They provide a service for creating jewelry; people can fill out an application online or order by phone (it is important not to break the law, that is, register yourself at least as an individual entrepreneur, then no one will interfere with this activity).
There are several ways to make pompoms yourself. They may differ in the technique of execution, the tools and materials used. Here are some basic ways:
- Fold the paper like an accordion, round or sharpen the edges. The result is a beautiful flower.
- A ball in the likeness of a honeycomb, which is made by gluing sheets in a special way (the method is described below in the text).
- Make individual flowers (for example, from paper napkins), then fasten them together and straighten them into a three-dimensional ball shape (described below).
- Cut the paper into circles, fasten them in the center, cut them into strips from edge to center (without cutting to the end), and then straighten them: you get a fluffy pom-pom.
Tools and materials for work
To make pom-poms, the main material and tools are paper: corrugated, paper, crepe, napkins. There are several basic ways to make paper balls, in which the tools may differ. For example, some crafts may use a hole punch, stapler, or other device. Parts of the product can be secured with thread or glue; in some crafts it is better to use several tools at once.
Styrofoam and even a trash bag can be useful for crafts. Must be used:
Examples of interior design with paper pompoms
Napkin balls can be used when decorating assembly and banquet halls, which acquire a special flavor. Balls made from napkins are delicate, airy, a “highlight” in the festive design.
Large pom-poms made from napkins can be hung from the ceiling, chandeliers or walls with your own hands.
Products assembled from different colors into a single whole can serve as a gift bouquet.
You can use them differently for each celebration:
- when decorating a banquet hall where a wedding is being held, you can attach satin ribbons to snow-white pom-poms suspended at a sufficient height, which will add elegance and shimmer in the light of the spotlights;
- the wedding celebration will also be decorated with a red and white composition;
It all depends on your flight of fancy and the number of elements made.
- they can not only be hung, but also attached to the backs of chairs, alternating colors;
- the room where a children's party is held will be even brighter and more elegant if its decor uses multi-colored decorations made from napkins, fixed at different levels and decorated with ribbons, including paper ones; You can “send” bright balloons inflated with helium to the ceiling;
Thanks to such flowers, we can always lift our spirits.
- if the hall has low ceilings, it will be decorated with a composition of pompoms, made as a kind of bouquet; you can place it in a free corner;
- they can be used to decorate fabric napkins placed near each cutlery;
Using simple flowers made from paper napkins and paper flowers, you can decorate your holiday table in an original way.
- they can be mounted on the wall like a panel;
- From paper balls you can make multi-colored rings, cascading decorations, decorated with other accessories.
These versatile decorations come in handy for the holidays.
The manufacturing process is so simple that even the little ones can be accepted into the family pompom workshop!
Many options for using pom-poms from napkins for decoration can be found on websites on the Internet.
In a festive interior, these decorations look bright, extraordinary and even fabulous, creating a solemn, unique atmosphere.
Corrugated paper pom-poms
Corrugated paper is often used to create decorations in the form of paper balls. To make a pompom from corrugated paper, you will need the following tools:
- roll of corrugated paper (creped);
- scissors;
- pencil;
- ruler.
When choosing a material, you need to pay attention to its size. It is best to buy a standard one, 50 cm wide. A regular roll is 2.5 m long. Step-by-step instruction:
- Work should begin by finding the middle of the roll, a line is drawn there. The roll must be cut along this line.
- Each of the two pieces must be divided into even smaller pieces of size: 25x40 or 25x50. You will get 6 or 5 pieces of paper.
- All rectangles are stacked on top of each other, with the short side facing the master.
- You need to fold the blanks like an accordion with the short side. Then you need to find the middle of the folded stack and make a mark with a pencil.
- At this point the sheets are tied with thread or ribbon. In this case, one end of the thread remains long.
- The next stage of working on pom-poms is design and giving them the desired shape and splendor. On the folded paper at the top you need to draw curves that resemble a flower petal, and then cut them off.
- The same must be done with the other side.
- There comes a time when the pompom itself is created. First you need to unscrew one side like a fan, and then the other.
- It is necessary to carefully and carefully straighten each layer so as not to tear the leaves.
DIY paper balls for hall decoration
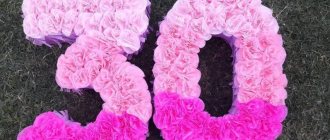
For a special event, paper pompoms are made by hand as decoration. Based on them, you can make now popular full-size numbers for children’s birthdays: cut out the corresponding number from foam plastic and wrap it in ready-made pom-poms, placing them evenly over the entire area. To make paper balls you will need the following tools:
- corrugated paper;
- thin cardboard (2 sheets);
- multi-colored markers;
- glue;
- scissors;
- thread and needle.
Having prepared everything you need, you can proceed to making crafts. For convenience and clarity, step-by-step instructions are provided:
- First you need to fold a sheet of cardboard in half, and draw a semicircle on one side so that it fits the fold. The larger the semicircle, the larger the pompom.
- Cut out a circle and cut it in half.
- Cut off the excess part to the width of the corrugated paper.
- On the second cardboard, draw lines with two different felt-tip pens (for example, red and blue). At the same time, they should be longer than the width of the paper so that the tails stick out from the top and bottom.
- Lubricate the blanks with red marks with glue and glue the first sheet of corrugated paper to them.
- Grease the glued paper in places where there are blue stripes with glue and attach the next sheet.
- Continue gluing the sheets alternately to different lines.
- You need to put a cardboard semicircle on a stack of corrugated paper and cut it along its contour, and then stick the cardboard (hemisphere) on the first and last sheets.
- In one corner of the craft you need to make a hole with a needle and fix everything in this place, at the same time leaving a loop so that the ball can be hung somewhere.
- Taking the ball by the cardboard edges, you need to carefully unfold it so as not to tear the thin paper.
- At the end, you need to glue the cardboard together, and the beautiful festive ball is ready.
Classic manufacturing method using cardboard
As you already understood, you will need cardboard. Using a compass, you need to cut out 2 perfect circles of the size you want. Just keep in mind that in these circles of hers there will be smaller circles. The greater the distance, the more magnificent the future product will be. For a hat, they usually make a pattern from 9 cm in size. The inner circle is no larger than 20 mm in size, otherwise it will be difficult to cut later.
After all the actions, the two circles are connected. You need to wind a good thread around them in a circle. The more yarn the better! It will be more beautiful if the hole inside is completely filled. With sharpened scissors, all that remains is to cut the thread along the front edge between the cardboard rings. To prevent the knot from coming undone, it is better to thread the thread and tie the knot. To prevent the thread from falling apart, hold the pattern tightly!
How to make paper pompoms in silence
To make the pompoms light, graceful and airy, it is better to use soft paper. The technique of working with it is different in that it requires special skill and accuracy so as not to tear or spoil thin sheets. For this craft you will need the following materials and tools:
- paper in silence;
- scissors;
- rope, cord, wire or wire;
- fishing line or thread for hanging;
- folding sheet (special brush for working with folds) – preferable.
The painstaking work will not take too much time, but it will require skill, patience and accuracy. The process consists of several stages:
- Place the paper in a stack on top of each other: the more sheets, the more magnificent the craft (the optimal number is 10).
- The entire stack needs to be bent like an accordion so that each turn (side) is approximately 2-3 cm. Iron each fold with a folding blade (you can use a ruler or work by hand).
- The tip of each side needs to be rounded with scissors (cut off the excess). Alternatively, you can make the edges sharp, which will slightly change the final appearance of the finished pompom.
- Find the middle and tie it tightly with a rope, ribbon, cord or any similar object you have.
- You need to carefully bend all the petals of the pompom flower - first on one side, and then on the other. This is the most painstaking and careful work: it is important not to tear a single petal.
- Attach ribbon, braid or rope for hanging.
- You can finally fluff and shape the pompom only when it is already hanging in its place.
Master class on making balls from crepe paper
A very thin but durable material is crepe paper. It is very convenient to make pompoms and other decorative elements from it, because it does not tear due to accidental movement, and at the same time lends itself perfectly to shaping. To create a pompom from such material you will need the following tools:
- crepe (tissue) paper;
- wire, stapler or thread;
- ruler;
- pencil;
- scissors;
- ribbon, braid or rope (to hang the finished craft).
The work should start like this - determine what size the pom-pom should be: what is the width of the sheet, so will the diameter of the pom-pom. As an example, step-by-step instructions for the craft will be presented: pom-poms made of crepe paper created from 8 sheets:
- Place 8 sheets of paper in a stack and bend them like an accordion so that the width of the strip is 2 cm.
- Using a ruler, you need to find the middle of the workpiece and bend it in this place.
- Tie the folded area with wire or rope very tightly so that the sheets do not fall apart.
- The edges of the workpiece need to be trimmed so that they become pointed.
- At the end of the work, you need to carefully straighten all the edges, you will get an elegant flower with triangular edges. If you take multi-colored paper, you can get a colorful pompom.
- Another way to use it is to straighten the edges on only one side and leave the other side alone, which will give the appearance of a bouquet that can be used to decorate a holiday table or put in a decorative vase on a shelf.
Step-by-step instructions for making pompoms from napkins
Regular napkins that are placed on the table to dry your hands can be an excellent material for creating pompoms. They are thin, pliable, soft, so the decoration will turn out elegant and elegant. Due to the size of the paper napkin, you cannot make a large pompom out of it: you will get small ones that are suitable for decorating a gift or as holiday table decor.
To make this craft you will need the following tools and materials:
- paper napkins (you can use several different colors, in the example there are 2 of them: blue and yellow);
- scissors;
- pen;
- hole puncher;
- thread.
When starting work, you need to carefully consider the purposes for which napkin pompoms are needed. Below is a step-by-step diagram of working on a pompom for a gift box:
- Take 4 blue napkins, stack them and roll them up as you would for cutting out a snowflake.
- You need to draw a semicircle along the edges of the folded piece and cut off the excess along this line.
- Unfold the napkins and you should get small, neat flowers.
- Repeat the same processes with 4 napkins of a different color.
- Collect all the flowers in a pile and fold them in half. Use a hole punch to make a hole near the fold.
- You need to pull a thread through the hole and tie it tightly.
- Straighten the resulting pompom - the craft is ready.
- A wonderful decoration would be a garland of pompoms made from napkins: they are small and elegant.
Artificial fur
To make the future ball, you need to take a cardboard blank slightly larger than the product itself. It needs to be attached to the inside of the fur piece and circled. The workpiece needs to be cut out and the edges swept from the inside so that the fur does not come out. The thread used to sew needs to be pulled together and the edges firmly fixed. If you need to hang it from something, then it needs to be left longer.
How to make paper pompoms (step by step instructions)
First of all, you should decide what size you want the finished product. You can use the format of available sheets of paper or cut the roll into several pieces. The width of the sheet will be the diameter of the pompom. The manufacturing technology is actually simple. It is based on folding an ordinary “accordion”, which everyone did in childhood when making a fan. Only here the work is complicated by the fact that the workpiece is made from several layers at once.
So, the sequence of work is as follows:
- Take 8 sheets of the prepared format and stack them one on top of the other.
- For reliable fixation while working, it is better to secure them with clamps or paper clips. Only this must be done carefully so as not to damage the thin paper.
- Fold the strip along the larger side of the sheets. Its width depends on the size of the pompom. Usually taken from 3 to 5 cm for interior decorations.
- Fold the accordion until your “stack” of sheets turns into one strip.
- Round the edges in an arc or semicircle.
- Measure the middle of the workpiece and tie it in the center with wire or fishing line. If you use thread, the pompom may fall apart later.
- Open your accordion. The result was a blank that resembled a bow. Gently smooth out any uneven surfaces.
- Bend the top layer from the right or left edge of the workpiece. Be very careful not to tear the paper. Although on large interior products the defects will not be very noticeable.
- Continue folding the accordion layers to the sides. When the product “fluffs” on one side, form the second part of the pompom.
All is ready. Then you can use the decor as part of any decoration or on your own by making a pendant from thread or ribbon.
What can pompoms be made from?
various pom-poms assembled into products
Classic pom-poms are made from knitting yarn. Other materials for their creation are:
- fur pieces
- paper of different textures and colors
- bags from small to trash
- napkins
- foil
- New Year's rain and tinsel
- fabrics, for example, tulle, felt
In addition to the basic materials, you will need:
- scissors
- blanks for winding thread or fastening other types of materials
- thread, thin wire or decorative tape to secure the middle
How to make pompoms from crepe paper
In fact, the stages of work do not depend on the type of paper. The only difference is in the preparation of the sheets. Corrugation, as a rule, is sold in rolls 2 - 2.5 meters long and 50 - 60 cm wide. To evenly divide the roll into eight identical pieces, you should do this:
- Without unwinding the bundle, measure the middle using a ruler or by carefully bending but not folding your tube.
- Cut along the found center.
- Now fold each of the two blanks in half twice, that is, first unwind it to its full length of 2.5 meters and connect the narrow sides together. The length of the workpiece turned out to be 1.25. Fold its edges again. After these steps, you will have a four-layer blank, half a meter long and half the width of the original roll.
- Cut the folds along the sides of the workpiece.
- Repeat the previous two steps with the other half of the original roll.
As a result of the work performed, you received 8 identical sheets from one roll of corrugated paper. Follow all other steps according to the instructions given in the previous section. Basically, you learned how to make large paper pom poms. One roll of corrugation is required for one product. If you need a very huge decoration, cut the roll not into eight, but into fewer pieces.
How to make a fluffy pompom for a hat?
girl in a hat with a fluffy pompom
The fluffiness of a pompom for a hat directly depends on the diameter of the object around which you wind the yarn. The second important factor is the volume of the ball of yarn. It will correspond to the diameter of the future pompom.
In addition to the classic cardboard round blanks, you will be suitable for:
- own palm
- cardboard rectangle
- mobile phone
- plastic bottle
- glass jar
The main thing is that you can pull the thread around the winding on both sides and tie all the threads tightly.
- Cut the circle to the right and left of the fixed center.
- Align the threads, cut off those that stand out in length.
Useful tips
If you want to learn how to make pompoms from paper of different colors in one product, simply stack the sheets, observing the order of shades. And, of course, if you cut the roll into pieces yourself, rather than using cut sheets, take rolls of the same length and width for one pompom in order to get blanks of equal format from different sources.
If you really want to combine some colors from rolls of different sizes or a ready-made sheet from a creativity kit and a rolled shade, use a ruler and a pencil to mark.
To make small pompoms, you can cut blanks from corrugated paper according to a cardboard template created in advance so that there are no marking lines left on the paper.
Fabric ball
To get 1 ball, you will have to prepare pieces of fabric 1.5-3 cm wide and 2 crescents of cardboard. Wrap sections around the crescents, but do not overtighten. The end is fixed with a speller or glue. Using scissors, the strips are carefully cut in the middle and removed. The thread is also pulled together and tied. If desired, it is possible to cut in a circle.
Advice! If you want to use 2 colors in a pompom, then wind exactly half of each color, alternating at the same time. Using threads of 2-3 colors, the ball will turn out to be multi-colored or even with a pattern of some image.
So, pompoms can be made from any available materials. You have convinced yourself of this. If you add creativity, then seeing your efforts and the beauty of the product, others may also be interested in it. Pompoms can be bought in a store, but shaping them with your own hands is unique, unusual and valuable.
And it's not a problem if you've never made pompoms. It's very easy to learn. I hope that by using the tips from this article you will become experienced craftsmen! Happy experimenting!
Interior decorations
So, you've learned how to make paper pompoms. Step-by-step instructions will help you quickly and easily create them yourself. Did you like this process and have you already made several of them? Even from this amount you can already create an unusual decor for the room. So, the following is made from paper pompoms:
- Hanging decorations floating in space.
- Fairy lights.
- Arches.
- “Curtains” for a window or dividing the space of a room.
- Letters on the wall.
- Compositions on the floor, walls, window sills, furniture.
In a word, you can offer and come up with a lot of ideas. The main thing is to create a lot of colorful fluffy paper balls. By the way, monochrome options will also come in handy. For example, white paper makes an excellent winter decor - an airy partition for a room made of “snowballs” floating in the air.
You've learned how to make paper pompoms and create some interesting decorations from them. Now you can create interior decorations with your own hands.