Give a gift without a card? No, it looks like something unfinished. Therefore, today, for the most part, donors always include this small addition.
However, there is a category of people for whom standard solutions are unacceptable. They create unique memorable “things” that can improve the mood of the person they are intended for and everyone who sees them.
A birthday poster is an ideal solution for creating a good mood for the hero of the occasion and his guests. How to make a poster for children with your own hands? Nothing supernatural. A little imagination and your masterpiece will hit the heart!
Where to begin?
The most important thing is to involve your loved ones and friends in this exciting activity. After this, you need to buy a large Whatman paper. Choose a topic, make a sketch of what it will look like on a regular A4 sheet.
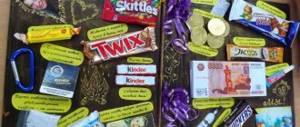
Poster of sweets for dad's holiday
Dads are a stern people, and they don’t have a strong desire for sweets, but if you offer an exciting problem, the male soul of an explorer and conqueror will not resist! To start making such a poster, you need to decide what you will give. Suppose we want to give dad a WATCH.
What you will need:
- Whatman;
- Paints;
- Marker black;
- Cupcakes "ChocoPie";
- Chocolate "Alpen Gold";
- Skittles candies;
- The tape is narrow;
- Simple pencil;
- Eraser.
We recommend reading: – DIY candy gifts, 7 crafts master classes step by step.
Process:
- In the center of whatman paper we draw a large rectangle, our sweets will be glued there;
- Under the rectangle we draw squares for the letters, just like in crossword puzzles. In the last square we write the letter Y;
- We outline the contours with a black marker;
- We design the poster in a style that the father will like: fishing, hunting, bowling;
- Glue the sweets: 1. “ChocoPie”, 2. “Alpen Gold”, 3. “Skittles” candies;
- When the gift is ready, hang it on the wall.
Please note: you must write the instructions on the poster or verbally explain the rules of the game to Dad.
As a result, dad should collect the word CLOCK in the lower squares and joyfully wait for the main gift.
Childhood holiday
To create a joyful, carefree mood, you need to use bright colors and materials. If the “artist is asleep” in you, no problem. Any patterns can be simply copied, printed, cut out.
It is important that each step is accompanied by funny, cheerful captions. The informational part includes the name and date of birth of the “defendant,” the names of his friends, wishes, and jokes.
Firework!
Even if you went the traditional route (went into the office with a postcard), no one bothers you to get three or four firecrackers for the premises and set up a fireworks display. Now there are firecrackers from which money flies out (you can choose rubles, dollars or euros), rose petals or regular streamers.
Let someone command: “Fire” so that it happens at the same time. It is better to warn the guards so that they do not press the panic button out of fear. The hero of the day will be showered with money from head to toe with best wishes.
“Cold fountains” also look great. These are completely safe tabletop or floor structures that will delight the birthday boy with bright silver splashes for a few minutes. Here's more about safe silver spray in the office.
The most killer option is a huge transparent ball that holds from 50 to 100 small balls and confetti. Needs to be hung from the ceiling. Now we need a daredevil with a pushpin. Ba-a-abah!!! And the whole office becomes colorful. I know a specialist in making such a “killer” surprise ball, I will help.
Congratulations for the spouse
Such a congratulation will please an adult no less than a child. You don't have to wait until your birthday. You can make a greeting card for any event: a wedding anniversary, buying a car/apartment, a long-awaited vacation, or just to cheer you up.
How to make a poster for your husband with your own hands? By and large, the manufacturing principle is no different from the children's version. It is important to think through everything down to the smallest detail. Fantasy will help you.
How to make a birthday poster for your friend, boyfriend and brother with photos and wishes?
Another way to make a beautiful poster for the birthday of an important man is to glue (or mount) a collage of photos on paper or in a computer program. It’s quite simple, but as a result you will get an effective wall newspaper that will instantly give the birthday person pleasant life memories and emotions. The main thing is to use only beautiful photographs, bright and meaningful.
Options for greeting posters with photos:
Poster of joint photos for your beloved guy
Poster from the photo “How it all began”: a love story
Poster in the form of a clock with a photo Poster in the form of a heart
Poster from a photo made on a computer
Small framed photo poster
Poster with photos and wishes
Preparation
First of all, divide the plane into three parts (top, center, bottom). Stepping back from the edge at the top, you need to draw a very thin, almost imperceptible line (this is necessary if you decide to make a multi-level poster). For now it will serve as a guide.
Do the same from below. This will be the “basement”, where important information will also be posted.
In the middle, create an axis with the same barely noticeable line. There will be a guideline for creating a drawing, sticking a photo, writing poetry, congratulations.
By the way, if you have a question about how to make a wish poster with your own hands, then this “blank” principle is perfect.
What to write on a Happy Birthday poster to a friend, boyfriend or brother, what wishes and congratulations?
Nice words and wishes, prose and especially poetry will help make your poster truly festive, bright and effective. You can write poems yourself, or you can use those suggested below.
Poems for a boyfriend, husband, lover on a poster:
Option #1
Option No. 2
Option No. 3
Option No. 4
Option No. 5
Poems for brother and friend on a poster:
Option #1
Option No. 2
Option No. 3
Option No. 4
What's next?
Now we write the title at the top of the sheet (it is best to do this with a simple pencil, determining the font and width of the letters).
In the “footer” the letter font will be slightly smaller than the top one. However, it's worth remembering that the information here is as important as the headline. Wishes, appeals, desires, everything that you consider necessary to be placed on this stand are placed here.
You need to place a basic drawing/photo in the center. Remember, attention is focused in this place. It is important to correctly define the boundaries for a key position.
It doesn’t really matter whether we make a poster for a birthday with our own hands or for other purposes, there should be places on the sides for that information/pictures that will be of particular significance.
They can be marked with rectangles, squares where pockets/envelopes can be glued.
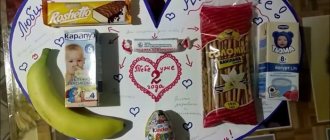
Sweets poster for your loved one
There is no figure more romantic than a heart, so for your loved one, I suggest making a cry in the shape of a heart with secret sweets.
What you will need:
- Whatman;
- White paper;
- Marker black;
- The paint is red;
- Simple pencil;
- Eraser;
- Your photo;
- Sequins;
- Scissors;
- Double sided tape;
- Sweets.
Process:
- We outline the outline of the heart on whatman paper;
- Paint the heart with red paint and sprinkle glitter on top while the paint is still wet. Let the drawing dry for several hours;
- Cut out the picture;
- We print out our photo. It is desirable that it be something interesting, intriguing, romantic in order to surprise the other half;
- We carefully wrap all the sweets in plain white paper to hide what we have prepared for our loved one;
- Using a felt-tip pen or marker in beautiful identical letters, write “Eat me” on each sweet;
- Glue a photo to the middle of the heart;
- We write confessions or sweet phrases in different places of the heart with a black marker;
- We carefully glue the sweets so that, upon removing them, the person sees the hidden phrases;
- On top of the photo, glue something massive and attractive on which it will be written “Eat me last.”
Now all you have to do is stick the gift in a prominent place and enjoy the bright emotions of your other half when she discovers her gift.
Saturate with colors
We need to add brightness and color. You don't have to use paints for this; pencils will do just fine. Trace the outlines with markers.
Let's start with the title. Add color. It all depends on your imagination. After that, go to the center.
How to make a poster with pockets with your own hands? Elementary. The main thing is to think about what you put in them. It’s better when some sweets with funny emoticons and captions peek out of your pocket.
At the end, circle the letters “basement” so that they become juicy and complete the overall thematic picture. That's it, your super postcard is complete.
Now all that remains is to place it in a visible place or give it to the hero of the occasion. We also make a poster for visualizing desires with our own hands.
Rules for poster design
11 rules for an effective poster:
Rule one. Compliance of text blocks (main and additional headings), as well as artistic design and design style with the theme, idea and purpose of the poster.
For example, a poster with information about a scientific conference or other official event is best done in a business style, discreet colors and discreet design.
Advertising, concert, holiday and greeting posters, on the contrary, should be designed brightly, catchily, creatively, and sometimes with humor.
Rule two
Informative, concise, interesting, attention-grabbing and easy to read text message. The text of the poster must be carefully edited: make sure it is short, clear and easy to understand, correct errors, get rid of unnecessary and insignificant words, unsuccessful phrases
Rule three. The key information contained in the poster should be read and remembered first. That is, the most important text block of the first level (the main heading) is typed in the largest font. More detailed information and details are included in text blocks of the second and third levels (additional headings, or subheadings). Smaller font sizes are used for them.
Rule four. One poster contains no more than two types of fonts that combine in style
When choosing a font, it is important to remember: the size and style of letters and numbers should not be discordant with the format and theme of the poster. It is worth considering that beautiful, but overly pretentious, decorative fonts can actually turn out to be illegible and tiresome for the eyes when reading from a distance
Rule five. Fonts should be visible and clearly visible from afar
To do this, it is important to choose the optimal line and letter spacing. Words, lines and headings of different levels should not merge into a continuous canvas on the poster
Otherwise, it will be difficult to read what is written.
Rule six. Images, backgrounds, frames and other visual elements of the poster should also correspond to the theme and complement the text block. They are selected and placed on the sheet in such a way that the text remains visible and easy to read. Some posters (in particular, diagrammatic posters, posters for visual education in school and kindergarten) may contain only images. Others (for example, educational posters-tables, posters-instructions, diagrams, etc.) may consist only of text blocks.
Rule seven. The sharper the text and images contrast with the background, the more noticeable the poster.
As you add elements to your poster, it is important to ensure that contrast is maintained and that letters, numbers and pictures remain easily visible from a distance.
Rule eight. The most important text elements should be placed at the top and right, and illustrations should be placed primarily on the left. This makes information read and remembered easier and better. This rule is associated with the peculiarities of our brain’s perception of verbal (verbal) and non-verbal (visual) images.
Rule nine. All elements of a proper poster must be made in a harmonious color scheme. It is advisable not to combine the colors of warm and cold palettes in one poster. If you know where the poster will be placed, it is better to select the shades of the background, symbols and images in accordance with the design of the room. Graphic designers use special color wheels and palettes to find optimal color combinations.
Rule ten
When designing a poster, regardless of its purpose and theme, it is important to observe moderation. Ideally, this is only an expressive contrasting background, laconic (at the same time maximally informative) text elements and images that harmoniously complement them
Rule eleven. You should not try to fill the entire space of the sheet. The poster can end up cluttered with details, tiring to the eye and difficult to read. When planning the arrangement of elements, it is worthwhile, as designers say, to “leave some air” - to provide areas of free space. This is one of the effective ways to increase the effectiveness of a poster.
The main stages of creating a poster:
- Stage 1. Determine the theme, purpose and style of the poster design.
- Stage 2. Writing headings and text blocks. Editing. Selecting suitable fonts.
- Stage 3. Search for poster design ideas. Selecting backgrounds and images. Choosing a harmonious palette of colors and shades.
- Stage 4. Creating a rough poster layout in a graphics editor. If the poster is drawn by hand, create a pencil sketch on paper.
- Stage 5. Making edits, adjusting combinations of font colors and images, line and letter spacing.
- Stage 6. Printing a test sample.
- Stage 7. Creating a final version of the poster.