The holiday of Easter means not only colored eggs and fragrant Easter cakes decorated with bright sprinkles, but also children's smiles, which in themselves can lift your spirits on any day. To experience this magic for yourself, you don’t need as much as it seems.
Sometimes a few sheets of colored paper can work real miracles. And to make sure they happen, we will provide diagrams and step-by-step descriptions of how to create crafts for Easter with your children from colored paper and colored cardboard.
DIY Easter crafts from corrugated paper and cardboard: diagrams
Children, in turn, can improve the mood of loved ones or decorate the holiday table by making a variety of crafts. An excellent option for Easter would be a funny cardboard bunny or an Easter basket. You need very few materials. Visit a hardware and office supply store in advance and purchase all the essentials.
Materials:
- 2 packs of wooden clothespins
- 1 cardboard plate or sheet of cardboard
- Scotch
- Glue
- Colored paper
- Ribbon
VIDEO: Paper egg coasters
Instructions for making an Easter basket from cardboard:
- Take a plate or circle of cardboard with a diameter of 22 cm and cut along the entire length of the circumference by 3-4 cm.
- Now bend the cuts to make something similar to a tray. Glue tape or a piece of paper along the rim with regular office glue. It is necessary to fix this threshold.
- Glue a handle from a piece of cardboard. To do this, cut a strip 30 cm long and 4 cm wide.
- Now attach clothespins around the entire circumference of the rim. It is necessary that they fit tightly to one another. You should get a frame.
- Glue a wide ribbon along the length of the handle. Along the circumference of the clothespin frame, also make a ribbon rim, tying a bow.
- Place straw or thin strips of green colored paper at the bottom of the container. This will be an imitation of grass. Place eggs on top of the pillow.
DIY crafts for Easter from corrugated paper and cardboard: diagrams DIY crafts for Easter from corrugated paper and cardboard: diagrams DIY Easter crafts from corrugated paper and cardboard: diagrams DIY Easter crafts from corrugated paper and cardboard: diagrams DIY crafts for Easter DIY Easter from corrugated paper and cardboard: diagrams DIY Easter crafts from corrugated paper and cardboard: diagrams DIY Easter crafts from corrugated paper and cardboard: diagrams
DIY Easter crafts made from cotton pads
Every woman has cotton pads in her cosmetic bag. You can use them to remove and correct makeup and even make Easter crafts. You can decorate your Easter basket using chickens made from cotton pads.
Materials:
- Several cotton pads
- Yellow egg paint
- Red colored paper
- Glue
- Wire
Instructions:
- Pour a little dye into the bowl and add water. Dip cotton wool into the solution and place on a plate. Let the cotton dry completely.
- Attach thin wires to the bottom of the disk, giving them the shape of legs. Cover the paws with pieces of cotton wool and paint them red.
- Cut out a scallop and beak from red paper. Glue on the eyes. You can separately cut out the wings from a cotton pad and glue them to the body of the chicken.
DIY Easter crafts from cotton pads DIY Easter crafts from cotton pads
“Easter 2021”: top 10 most beautiful ideas for Easter crafts for kindergarten or school
We make crafts for Easter with our own hands from all sorts of things. Very cute bunnies, chickens, Easter eggs, baskets and Easter cakes.
We have collected for you the top 10 ideas for children's Easter crafts that your child will undoubtedly like and add positivity to such a bright and cheerful holiday.
Idea No. 1 “Mobile rabbit”
This craft is easy to make. And besides, it has a secret. The bunny's head is movable! Cool feature, kids will definitely like it.
- Take a strip of paper 30 by 5 cm. Mark half the length of the strip with a pencil.
- We bend both edges towards the middle.
- Glue the edges to each other. We have a double base, and above it is a semi-arc.
- Fold a 5 by 5 cm square in half. On one edge of this strip we cut off the corners, making deep cuts. These are the front paws of a rabbit. Glue them to the base.
- On paper we draw a circle (muzzle) and 2 droplets (ears). Cut it out.
- We draw pink droplets on the ears. Glue or draw eyes and a nose. We draw mustaches.
- Fold a 10 by 7 cm rectangle in half.
- Cut off one corner. Cut along the fold line. On each half, where the corner is cut, draw small pink ovals. We made the hind legs.
Further
- We glue the legs to the base so that the cut corner is on the outside and the ovals are visible. The rest of the workpiece is under the base. We do this with one and the second blank.
- We bend a strip of paper 3 by 6 cm into an accordion shape.
- Glue one edge of the accordion to the arc, and the other to the rabbit's face.
- The final part will be gluing the tail.
Idea No. 2 “Chicken for an egg”
Cut out a section from an egg carton. There should only be a cone and one recess for the egg. We cut off all excess. We paint the workpiece white.
From red fabric or felt we cut out:
Rhombus. This is a beak. Let's bend it in half, glue the fold line to the workpiece and you will have a first-class beak!
Droplet (without sharp end). This is a beard. It is glued under the beak.
A large “droplet” with a wavy edge on top. This is a comb. We place it in the hole on top of the cone and fix it.
Let's draw some eyes!
Idea No. 3 “Easter Easter cake”
You need to choose a shade of plasticine that is similar to baked goods, for example, a mixture of brown and orange will do. A cylinder is formed from the resulting mass, expanding slightly upward.
Then you need to take white plasticine, roll it into a flat cake and cover the brown cake on top. This will be the icing.
The icing is decorated with small balls of different colors - this is sprinkles. A candle is placed in the center: two sausages of different colors are twisted into a rope, which tapers upward (at the end of the candle there is a yellow light).
Balls are formed from plasticine of different colors - the basis for eggs. They need to be given an oblong shape.
All that remains is to assemble the entire composition, placing it on a plastic plate.
Idea No. 4 Egg box – “Easter Bunny”
Easter egg boxes are small crafts that children can do under the guidance of adults - teachers, parents or grandparents. Painted eggs are usually placed in such stands - symbols of the Easter holiday.
We offer an interesting, cute version of a box made from waste material.
You can decorate it in the shape of a bunny. These cute animals are often depicted as symbols of the Easter holidays. It is also not forbidden to decorate the craft with greenery, flowers, butterflies and other details.
To make an Easter box you need to prepare:
- a small waste box that will hold an egg;
- colored and white paper; plastic eyes;
- drawings of eggs and butterflies (or draw them yourself);
- scissors;
- glue.
How to make a basket for an egg in the form of a box step by step
Prepare a small box for work and the top part must be cut off. That is, leave the basket and try it on, put the egg in it so that it fits. This will be a nest for an Easter souvenir. Cut off the top part so that one wall remains intact. In the future, you will need to cut out the shape of the bunny.
Cut the intact wall of the box so as to obtain a rounded part. Leave the ears at the top, because the bunny’s ears should be long. And leave paws on the sides to grab the egg.
Decorate the surface. To do this, you can use colored and white paper and make the bunny white or gray. Either gouache or acrylic paint will do. That is, you can simply paint the paper with any chosen color and brush. Here the figurine was covered with paper. Cover the front and back of the bunny figurine, including its paws and ears, with white paper. Duplicate the inner sides of the ears with pink.
Decorate the box itself in any color, for example green. Also decorate the inside of the basket. It can be filled with sisal, straw or leftover colored paper.
Cut out flowers from colored paper, glue them, glue leaves to them and start decorating the basket.
Decorate the front of the basket. Here you can glue decorative eggs, butterfly figures, cut them out from a children's magazine or printouts. You can also draw these details. Draw 2 legs on white paper, cut out and attach in front. Decorate the bunny's face with doll eyes and draw a nose with a felt-tip pen, add a flower.
An interesting Easter-themed children's craft is ready. Place an egg inside and get ready to celebrate a wonderful holiday.
Idea No. 5. Easter cards in scrapbooking style
Crafts in the now fashionable scrapbooking style are quite simple to make. You just need to visit a specialized store and purchase the materials necessary for creativity. For example, try making this wonderful craft:
- Glue special scrapbooking paper onto the cardboard base.
- Glue a basket on top, and inside - multi-colored Easter eggs cut from scrap paper.
- Decorate the picture with twigs, lace, and beads.
You can make a card in scrapbooking style from home materials. You will need:
- Paper lace napkin;
- Colored tape;
- Multi-colored cardboard;
- Beads;
- Buttons.
Glue a lace napkin and all decorative elements to the cardboard base.
Idea No. 6 “Holiday tree”
An interesting variety of DIY Easter crafts can be a themed tree. To create it you need willow, cherry, willow twigs.
Here is a step-by-step master class:
- Take a chicken egg and pierce it on both sides. Carefully blow the contents into a plate.
- We wash the shell, dry it, and paint it. You can use decoupage. To do this, cut out the piece of three-layer napkin you like. Carefully tear off the very first layer. Apply to the surface and coat with a brush dipped in glue.
- Having prepared several eggs, we hang them on branches in a chaotic manner. We place the composition in a tall vase.
Idea No. 7 “Crafts from socks”
We present to your attention cool crafts made from socks. This is an original craft that will definitely surprise you and your child.
Look at how cute and funny these toys are, you can’t help but smile, and they’re so easy to make in 5 minutes, and you don’t even need to sew anything. This type of work will appeal to both teenagers and adults.
Let's start, perhaps, by creating a bunny and watch the master class, and then return to the little yellow lumps.
So, the materials we need:
- socks
- rice
- elastic bands or threads
- marker
- scissors
- beautiful ribbon (braid).
To make it easier to pour the rice, pull the sock over a tall glass or jar. But you can do without such devices.
Now transfer the rice. You can straight from the bag or use a measuring cup to ensure nothing spills.
We estimate that there will be enough filler for the full growth of the future hare.
Tighten at the top with an elastic band or thread.
We determine the place where it is better to form the head.
We separate it from the body again using an elastic band.
You can even make a ponytail using the same method.
razrezanie noska dlya ushej
Cut off the excess sock, leaving 5 cm for the ears. If you want, let them be longer so that they hang down.
Make a cut in the middle with scissors.
So far the ears are somehow square and not interesting. Draw the correct shape with a marker and trim off the excess fabric.
All that remains is to draw the bunny’s eyes and nose, wrap a ribbon around his neck and tie a bow.
Thus, create bunnies of different sizes, with protruding or drooping ears, with a butterfly bow made of cord. The nose (and tail) can be made from small pompoms, and the mustache from toothpicks.
Well, for the chickens you will need yellow socks - footprints.
Idea No. 8 “Crafts from cotton pads”
Without the image of a chicken or an angel, it is difficult to imagine the Easter holiday. Let's try to make an interesting simple craft - a bright and cute chicken that can become an element of Easter basket decor or decorate a room during the holiday.
To work you will need:
- cotton pads
- yellow egg dye
- colored paper or cardboard sheets of the desired color
- scissors
- chenille wire
- glue
Let's get started:
- Dilute the paint with water and dip cotton pads into the solution. For one chicken you will need two yellow-painted disks. We leave them to dry.
- We will make paws from chenille wire of a suitable color.
We dye the cotton pads and divide them into two halves. Getting the paws ready
- Cut out a comb from red or orange paper, wings and a beak.
- We place the parts cut out of colored paper between two cotton pads and glue them.
- For the chicken's eyes, you can use toy blanks or cut them out of paper and draw a black pupil. We glue the eyes on both sides.
We glue toy eyes, wings cut out of colored paper, a beak and a comb
You can also make angels from cotton pads that will complement any interior.
How to make an angel from cotton pads?
- Divide the cotton pad into two parts.
- Place the bead in the center of one of the parts of the cotton pad. We process the edges of the cotton pad with zigzag scissors for a more aesthetic appearance of the product.
We tie the button with thread
- We bend the disk with the bead inside in a circle and wind the thread under the bead. We straighten the resulting “skirt” from a cotton pad.
- Fold the second part in half. We wrap the edges of the workpiece at the same distance from the center. After this, we wrap the edges towards the center.
Making the wings and body
Having dipped a toothpick in glue, unfold the slightly twisted cotton ball and glue it inside. Glue the wings to the body.
We connect the parts with glue and apply shiny paint on the dots on the wings.
All that remains is to apply a halo stripe on the head and dots on the wings using paint with glitter and the delicate angel is ready!
Idea No. 9 “Paper chicken”
The Paper Chicken craft will be an easy and even quick craft option that will take you a little time.
To work you will need:
- paper plates or cardboard
- paints
- colored paper
- glue
The process of making chicken from paper
- Cut out a circle from a paper plate.
- Bend the circle in half
- Cut out wings, eyes, comb and beak from colored paper
- Glue it to the plate
Please note that you can also make chicken from a paper plate in just 5-10 minutes
Idea No. 10 “Chicken made of plasticine”
The chicken represents rebirth and continuity of life, and is therefore considered an Easter symbol. You can make a chicken from plasticine as follows:
1. Roll yellow plasticine into a ball. This will be both the body and head of the chicken.
2. Make paws from orange plasticine. To do this, flatten two small pieces of plasticine and use a knife to give them a triangular shape. Cut the bases of the plasticine triangles with a knife in the form of cloves. Attach the legs to the bottom of the yellow ball.
3. Press two small pieces of yellow plasticine into a flat shape. Cut them out with a knife in the form of droplets. These will be chicken wings. Attach the wings to the sides of the yellow ball.
4. Roll yellow plasticine into tubes. Attach them to the top of the yellow ball in the form of a tuft.
5.Use two miniature black plasticine balls to create the chicken’s eyes. Make the nose from orange plasticine. Your chicken is ready.
Video: Easter chicks
DIY crafts for Easter from napkins
You can make a lot of interesting crafts from napkins. One of the most attractive is the Easter tree.
Materials:
- Pack of blue or pink napkins
- Cute dry branch
- Wire
- Cigarette paper
- Glue
- Paints
- Plastic pot
- Styrofoam
- Colored paper
Instructions:
- Take a piece of driftwood and sand it with sandpaper. If there is no driftwood, weave several wires together to imitate wood. Cover the wire with tissue paper.
- Take a napkin, unfold it and crumple it. Lightly wet your hands with water and shape it into a ball. Let dry completely.
- Glue the balls to the driftwood. Take a pot and put foam in it. Stick in a piece of driftwood with balls and place a cushion of colored paper on the foam.
DIY Easter crafts from napkins DIY Easter crafts from napkins DIY Easter crafts from napkins
For babies
And if you want to make crafts with a very small child, you can come up with a simpler applique
There are only 3 steps and the picture is ready:
- Cut out circles.
- Cut from one side to the middle of the circle.
- We bend the edge.
All! All that remains is to glue and finish the eyes and legs! And don't forget to glue the nose.
Crafts from foamiran for Easter: templates
Foamiran is a fairly new material on the domestic market. It is also called plastic suede or velor. It perfectly changes shape right in the hands of the craftswoman, because in order for the material to become pliable, it is enough to heat it in the hands. We suggest making an Easter basket from foamiran.
Materials:
- Foamiran of different colors
- Glue gun
- Beads
- Basket filler
Instructions:
- Cut out a circle and a strip from foamiran, which is equal in length to the circumference. Glue the rim to the circle to create a container.
- Glue the handle. Connect the parts using a heat gun.
- Cut the foamiran into petals. Hold them a little in your hands and stretch them. Place the pieces on a soft cloth and place corrugated paper on top. Iron the pieces. This technique will give the petals texture.
- Using a glue gun, glue the petals together and attach a bead to the center. Glue the flower to the handle of the basket. After this, you need to decorate the handle with a thin satin ribbon. Fill a basket with crumpled strips of green paper and add eggs.
Crafts from foamiran for Easter: templates Crafts from foamiran for Easter: templates Crafts from foamiran for Easter: templates
For a school competition
This is a craft applique. And for it we need an oval or egg template.
- We trace the template on a colored sheet of paper.
- We connect them at the base using a rectangular strip, as in the photo
- Now we place the template on the outlined outline so that the sharp edges overlap one another. It turns out such an oval “eight”
- We bend it in half.
- We cut out a recess at the fold in the middle.
Cooking chicken:
- Cut out another smaller figure eight. The top part is often round, this is the head of the chicken. The lower part is larger than the upper.
- We make eyes and beak from paper. Glue them.
- Cut out the paws.
- Place the chicken in the hole.
- Underneath it we glue the paws onto the base.
- Decorate the chicken's head with a feather.
So that the craft can stand, we glue a strip of paper bent in half at the bottom. One edge to one oval, the other to the second.
How to make Easter crafts with your own hands quickly?
There are a lot of crafts that require a minimum of time and materials to make. One of these crafts is Easter bunnies made from shells.
Materials:
- 2 eggs
- Artificial fur
- Paper
- Paints
- Glue
- Thin wires
Instructions:
- Take a raw egg and carefully remove the liquid through the small hole. Wash and dry the base. Paint the egg white or beige.
- Attach the wire legs, having previously covered it with paper or corrugated paper
- Glue on a faux fur forelock. Draw the eyes and mouth.
- Cut out long ears from paper and glue them to the hare's head.
How to make Easter crafts with your own hands quickly? How to make Easter crafts with your own hands quickly? How to make Easter crafts with your own hands quickly?
Paper roll bunny
Let's look at how to make an Easter bunny out of paper. The basis will be a toilet roll; such crafts are very popular; you can come up with many animal models. If you add, as in this case, the craft with bright threads and a bow, then you will get an unusual model. Children love to combine different materials. If you have pompoms and plastic eyes, then feel free to use them all to create your masterpieces. Let's look at how to make a paper bunny using a simple method. Let's coincide this craft with the Great Easter holiday, since it is the bunnies that are often depicted as symbols on such applications.
What you need to prepare for work:
- a set of colored paper;
- scissors;
- black pen;
- glue;
- toilet paper roll;
- bright threads, for example, red and white;
- 1 pink pompom;
- 2 plastic eyes;
- bow made of organza and ribbon.
How to make a bunny step by step
- Prepare paper, roll, thread and everything you need. You can immediately paint the roll with any paint or cover it with a sheet of paper, but here we will cover it with bright threads.
- Using scissors, make symmetrical cuts in the roll on both sides. To insert the necessary details later. This is a convenient and reliable mounting method.
- Glue the ends of bright threads, for example, red and white, to the wall of the roll, and begin to wind it in a dense layer.
- Wind the thread around the central part of the roll, but the border will be the edges of the cuts that were made in the previous step. The bunny will be dressed in a cozy sweater.
- Next, attach the roll to blue or white paper and draw out the lower part of the craft, that is, the bunny’s paws. The height of these legs should be such that they fit clearly into the cut. Draw with a simple pencil and mark the ends with a black pen.
- Cut out an oblong oval piece and insert it into the lower slits.
- Using the same scenario, make a head, that is, these will be paws, and on top there will be a circle-head. Also make long ears for the bunny.
- Glue the eyes in the center of the head. Draw a mouth, mustache and attach a small pink pom-pom as a nose. Also glue the ears to the head.
- Insert the paws and head into the upper slits and decorate the bunny figurine with a bow in front. The length of the upper legs will be the same as the lower ones.
- A bright unusual craft in the form of an Easter bunny made of paper is ready. If you like to work with children, then you will have a whole collection of unique crafts that you will periodically look at together.
Crafts for Easter from kinder eggs
You can make a lot of interesting crafts from plastic capsules from Kinder Surprises. These could be chickens, rabbits or bees.
Materials:
- Surprise capsule
- Yellow foamiran leaf
- Colored paper
Instructions:
- Cut out the tail and wings from foamiran. Give them texture with your hands, stretching and twisting the parts.
- Glue the parts to the yellow capsule. Cut out legs from thick paper or cardboard and attach them using glue.
- Glue the beak and eyes.
Crafts for Easter from Kinder eggs Crafts for Easter from Kinder eggs
Each egg has its own face
Another simple and at the same time very interesting option for children to make paper crafts for Easter is an egg decorated with all kinds of patterns. The base is an egg cut out of paper or thin cardboard. Next, we connect colored pencils or markers, our imagination and start painting the egg.
These can be simpler shapes - waves, zigzags, circles - to painting with “hearts”. There are many options, and each child will be able to create a truly unique “face” for the drawn egg. Of course, such a craft is also available to children of the younger group.
INTERESTING ADVICE
You can also decorate the egg not with felt-tip pens or pencils, but with pieces of colored paper or plasticine. The result will be a beautiful, bright applique that will decorate the house and will certainly please the parents.
DIY Easter crafts made from pasta
Pasta is a rather strange and unusual material that is used in making Easter crafts. You can use them to make an Easter basket.
Materials:
- Pasta “Wheel”
- PVA glue or glue gun
- Balloon
- Spray paint
Instructions:
- Inflate the balloon and glue the pasta to it. The ball must be completely covered from below to halfway.
- Starting in the middle of the ball, place a handle of pasta. Try to ensure that the pasta fits tightly against each other and there are no gaps. They must connect into one whole.
- When the pasta is completely dry, pierce the ball with a needle and carefully remove any remaining residue.
- Use gold spray paint to paint the basket. Now you can safely fill it with eggs.
DIY Easter crafts from pasta DIY Easter crafts from pasta DIY Easter crafts from pasta
Crocheted Easter toys
For children of high school age, the ideas for crafts that I proposed above will, of course, turn out to be simple. You can try to get them interested in something more complex, for example knitting. Of course, if you yourself have this skill. The master class below just illustrates what can be done using this technique on the theme of Easter.
The materials you will need are a hook, multi-colored threads (white, yellow, red) and a little padding polyester.
Stages:
We will knit a chicken sitting in a shell. We work from the bottom up and first we knit the shell itself from white threads.
Then we change the threads to yellow ones and, without violating the integrity of the “structure,” we knit the body of the chicken. When you reach the head and there is very little left to complete, fill the inside of the toy with padding poly. And only then can you finish.
Next, sew knitted wings to the body.
And little red paws.
Also, do not forget that there is still a second part of the shell left - the one that will sit on our chicken’s head. We knit it too.
Finally, we use red thread to make a beak and a comb, and sew on beads as eyes. The toy is ready.
You can tie or tie, in fact, anything that is suitable. By the way, about the latter: you can make such a cute Easter craft if you simply tie a plastic container in the shape of an egg. All the necessary materials are a hook, yarn, handles from the right place and a little perseverance.
What do you think of this interpretation of the main attribute of Easter? As for me, it turned out very beautiful and even somehow cozy.
Or here is a very delicate composition.
Cute Easter egg hats will surely cheer everyone up too.
Bunnies like these will look good on the holiday table. Personally, I would definitely appreciate it.
You can make a couple of chickens for your loved ones or friends as a souvenir. Would you like this Easter gift?
You can even crochet a whole Easter cake with a regular crochet hook! As they say, a holiday that is always with me.
Well, now I offer you toys with diagrams and descriptions of work. Choose, because what to knit for Easter excites all needlewomen. For example, these wonderful eggs or decorate them coolly, dress up the shell.
Or this basket.
Cheerful and perky, this is a yellow... chicken.
It is also quite possible to make a bird out of yarn and knitting threads.
Fabric crafts for Easter: diagrams
You can make a lot of interesting crafts from fabric. These include garlands, Easter bunnies, chicks and garlands. Use diagrams and drawings.
Fabric crafts for Easter: diagrams
Fabric crafts for Easter: diagrams Fabric crafts for Easter: diagrams
Crafts made from salt dough for Easter
You can make a lot of interesting and unusual things from salt dough. Try to make a stand for a chicken egg.
Materials:
- 320 g wheat flour
- A glass of fine salt
- Partial glass of water
- Paints
- Toothpick
Instructions:
- Knead the dough from the indicated products. Roll it out into a circle. Make a rim from the dough and glue it to the mug, make a tail and a head.
- Glue the parts to the recess. Use a toothpick to give the product some relief. Place the product in the refrigerator.
- Once the dough has hardened, paint it with yellow paint.
Crafts from salt dough for Easter Crafts from salt dough for Easter Crafts from salt dough for Easter Crafts from salt dough for Easter
Volumetric applications with napkins
Beautiful, bright and voluminous paintings are obtained using napkin balls. Moreover, not the entire picture can be designed in this style, but only some detail that you want to make voluminous or fluffy.
We tear the napkins into pieces and crumple them or roll them into balls and glue them on PVA. Kids will love this activity because it’s simple and you don’t need to cut anything.
DIY Easter crafts from ribbons
Ribbons are an inexpensive material that can be found at any fabric store. This material can be used to make baskets, eggs and even Easter wreaths. The photo shows a lot of ideas for creating similar crafts.
DIY crafts for Easter from ribbons DIY crafts for Easter from ribbons DIY crafts for Easter from ribbons
The most interesting Easter applications
Interesting does not mean difficult! And now I’ll show you some very cool applications that are surprisingly easy to make! They don't even need a template, it's so easy.
Cut out:
- one white egg (this is the Bunny’s body and head);
- 2 white ovals are paws;
- 8 pink small circles and 2 larger pink ones (for paws);
- 2 white elongated ovals (ears);
- 2 smaller pink elongated ovals (for ears);
- 1 pink heart – nose;
- 2 small pink mugs (eyes).
Glue the white parts onto the base first, then the pink parts.
You will also need black plastic eye blanks. And a green ribbon bow on the Bunny's ear
That's all! But this work looks very cool!
Plasticine crafts for Easter
This option is suitable for the little ones. These are preschool children for whom modeling will improve their fine motor skills. The simplest option is an Easter egg.
Materials:
- Several pieces of multi-colored plasticine
- Kinder Surprise capsule
- Toothpick
Instructions:
- Roll sausages from plasticine tonic. They must be different colors.
- Cover the surprise capsule in a spiral with thin sausages. Using a toothpick, apply a relief design.
- Decorate the eggs with bows or plasticine flowers.
Crafts from plasticine for Easter Crafts from plasticine for Easter Crafts from plasticine for Easter Crafts from plasticine for Easter
DIY felt crafts for Easter
The easiest option is to make a garland of Easter eggs.
Materials:
- Felt of different colors
- Ribbon
- Hole puncher
- Glue
Instructions:
- Cut out egg shapes from felt. Make holes on both sides using a hole punch.
- Glue strips and felt circles of a different color to the eggs.
- String the pieces onto the linen and attach the garland to your dresser or window.
DIY felt crafts for Easter DIY felt crafts for Easter DIY felt crafts for Easter DIY felt crafts for Easter
Postcard using cotton swabs
I offer a very simple idea on how to make beautiful Easter egg designs using cotton swabs. If you want to give a gift to relatives for Easter, then they will be very pleased to see that this egg was painted by the child himself. It may not be drawn perfectly, but it is very picturesque and free, so any result here will touch you, and at the same time remain as a memory. All you need to do is prepare everything necessary for the child and, perhaps, set an example, and then it will be entirely his creativity, and he will do everything himself.
My child and I decided to make these eggs too. Of all the master classes in this article, for some reason Vanya was most delighted with drawing with cotton swabs.
Even babies can color eggs this way. Alternatively, you can paint with finger paints and your fingers.
Materials:
- white cardboard or paper,
- scissors,
- cotton buds,
- dye
1. First, draw a stencil of an egg on a sheet of paper and cut it out. And on a sheet of whatman paper or thick paper you draw as many identical eggs as needed.
2. Children can cut them out themselves, but if they are small, then help them.
3. Next, take cotton swabs and paints - and you can create. I showed the principle a little, and the process began.
4. At the same time, you can repeat the letters.
5. The first batch is ready. But it turned out to be not enough for us, Vanya is a thrifty comrade, we circled more eggs.
6. Even mom creates. This is my favorite:
7. Well, that’s all, a bunch of postcards are ready, Vanya already has an idea of who he will give them to.
8. The chicken seemed to lay all these eggs)) It was fun!
Even such a simple task can be used for learning. You can show children how to draw lines and dots. Talk about patterns, what types of lines there are - straight, wavy, zigzag. Show different elements - flowers, circles. Older children can be told what an ornament is – the repetition of identical elements. About symmetry. You can talk about the combination of colors, for example, that, ideally, there should be no more than three colors and their shades.
VIDEO: Crafts for Easter
DIY Easter crafts for the competition DIY Easter crafts for the competition DIY Easter crafts for the competition DIY Easter crafts for the competition
As you can see, Easter is a wonderful holiday that will help you get closer to your children. Don't miss the opportunity to make holiday crafts together.
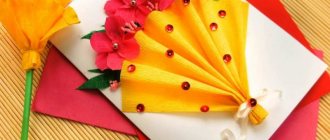
Cockerel made of colored cardboard
Using a simple, original master class, we will make one of the most interesting crafts with our own hands for Easter together with the children.
What you will need:
- colored cardboard;
- eyes for crafts;
- rhinestones;
- simple pencil;
- ruler;
- hot glue;
- scissors;
- sample.
Manufacturing:
- Download the template and place it on the edge of the cardboard with the smaller side. We outline the template with a pencil, mark with lines the beginning and end of the segment, which we will cut into thin strips.
- We fold the cardboard along the top line of the template, cut off the excess part along the bottom line of the template.
- We cut the segment with the markings into thin strips, folding the workpiece.
- We also cut out a beak, comb and “beard” from red and orange cardboard. Glue all the parts in place on the inside of the resulting workpiece. Glue both parts of the cockerel's head without gluing the lower part.
- We bend the rear solid part of the workpiece down along the central top line and glue it together.
- We insert the resulting glued part into the head blank, bending the entire blank, and glue the parts together.
- We glue rhinestones on both sides to the “wings” from below.
Interesting!
It turned out to be a very cute souvenir for Easter gifts for friends and family.