A little theory about cards in quests
Tasks with cards are one of the most popular and frequently encountered tasks in home and, especially, street quests for children and adults. It can be either a separate riddle, a stage of a quest, or the basis - a task that unites all stages of the game. It all depends on the goals and objectives in each specific case.
Map as a separate quest task
Let's say you are planning a rather complex quest with various riddles for a team of 3-4 children and you need a map as one of the stages of the game. That is, at a certain moment after solving the next puzzle, players find a map on which they search for the next task. It turns out to be such a visual passage riddle. It would seem that draw a starting point, an apartment plan, a cross with a finish line and you’re done. You can, of course, do this, or you can get confused and amaze your young quest lovers with originality. We'll tell you how.
Invitations
Ordinary invitations for such a colorful theme are unthinkable, and the kids will certainly love the original “cards.” Make your own pirate party invitations for kids:
- paper boat with text on the sails;
- map with burnt edges , "antique". Draw a diagram of the path to your “island” or “cave” (where will you celebrate your pirate birthday?);
- encrypted message - riddles, rebuses, puzzles (simple, for children). The answer will be “I invite you to a party” or “come at the date and time”;
- a chest with a letter from Flint himself and chocolate treasures in golden foil. Or a black label with text inside/on the back;
- a mysterious message in a bottle that has wandered on the waves for a long time (decorate with shells and starfish).
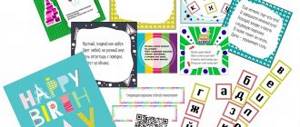
Types of task cards for quests
Puzzle map
A slight complication of the simplest type of cards. Draw a plan of the “terrain” and a recognizable point on it, for example, a TV. From this current you can draw a schematic route with a dotted line, winding around the apartment and ending with a cross in some corner. Don't draw any more objects, otherwise the task will be too simple. Next, cut this card into 6-8 pieces and fold them together, you can put them in an envelope or use a paper clip. Hide this card in the previous hiding place and, if necessary, provide an explanatory note. When cutting the map, it is important to pay attention to the fact that each piece contains an element of a picture or route. This will make it easier to put everything together.
Children begin to understand cards and associate the image with a real object around 4-5 years of age. Therefore, the map should be simple and understandable, and the objects should be recognizable. A quest for a child can be arranged in literally 10 minutes. For example, let's hide 5 toys in the apartment: a fish in the bath, a mouse in the refrigerator, a squirrel in the closet, a bunny on the bed and a cat on the sofa. The child needs to find all the animals on the map and put them on a train by color so that they go on vacation. Moreover, it is not necessary to have a toy - a steam locomotive; the trailers can be drawn on sheets of paper and laid out on the floor. When all the animals “go”, at the same time we will exercise our imagination in the game.
Pirate map
The top of any map rating is the pirate treasure map. Making such a task step by step looks like this:
1. Take a sheet of plain paper from an A4 printer and draw a map on it (you can draw at the very end, but it will look more realistic in the end). We recommend drawing with a black waterproof marker; a permanent one will do. It is necessary to draw a schematic plan for the location of “strategically” important objects in the house or in the yard. And also don’t forget about hidden artifacts; they are marked on the map with bright dots or crosses. There may be several artifacts and from them players can assemble a task, or there may be just one cross in the place where the next riddle is hidden. Start from what you need in a particular game.
2. Crumple this sheet in your hands, imagine that you are making a snowball.
3. Take a baking sheet from the oven (or any other flat, shallow vessel, such as a basin), pour hot water into it. A depth of 1-2 cm will be enough.
4. Straighten the leaf and place it in a baking tray, pour a couple of spoons of coffee on top or put 2-3 tea bags (the tea should be black). The sheet will float, so you need to press it down with something - the same bags or cutlery. It’s better to stir the water.
5. Leave the whole thing for 5 minutes. Then remove the sheet and dry it. For efficiency, you can iron it with an iron through gauze or fabric that you don’t mind (it can get dirty from tea) or blow on it with a hairdryer.
6. To make it more realistic, you can set the edges of the card on fire with a lighter or matches, although this is not necessary. This will turn out to be a 100% pirate scroll.
7. If you didn’t draw a map on the sheet at the beginning, it’s time to do it now.
The map is ready.
For extra cool, roll the card into a tube, tie it with thin twine and stick it in a wine bottle (the label should be washed under running warm water). Ask dad to cork the bottle and give the children a corkscrew - and another dexterity task is ready, let them try to open it themselves. And if you also fill the bath with water and foam and throw the bottle in there, you will get just a bomb riddle. If you are afraid to give children a corkscrew, then the cork can be slightly corked, so that you can loosen it with your hands and open it.
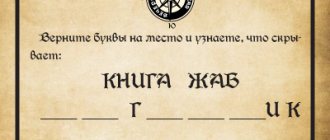
Invisible card
It looks like a simple piece of paper with nothing on it. We only advise you to sign the title at the top with a marker. Firstly, it will be clear what is in front of the players, and secondly, it will be easier to correctly orient the map, roughly speaking, where is top, bottom, right, left. Invisible cards can be drawn with invisible ink or wax.
1. Map drawn with invisible ink.
There are several ways to make such a map. The easiest one is to paint with lemon juice. You can also use milk, and stationery stores, and sometimes Rospechat, sell pens with invisible ink.
Let's take the “classic” method - lemon ink. For this we need one lemon. It is ideal to have a pen, but you can get by with, for example, a toothpick and patience. We advise you to first draw a regular map with a black marker, it will serve as a stencil for us. Then we place our future map on the stencil (if it is not transparent, use a window) and carefully outline it with lemon juice. Cut a lemon, dip a toothpick into it and trace the outline. We advise you to make the most simple map possible, without going into detail, because... This method is labor-intensive.
This card must be read over a fire. This means that such a riddle is not suitable for very young children. We recommend using a candle as a fire and controlling the process as much as possible so that no one gets injured. You can try using the light of a simple flashlight, maybe it will be enough, but with a light it is much more authentic.
It's the same with milk. To see what is written, you should hold a candle to the paper or shine it with a flashlight.
2. Map drawn with a UV marker.
There are such markers, of course, not in every store, but you can buy them in any small city. You need to read the map in the light of a UV flashlight, which is most likely sold in the same place where the marker is sold.
3. Map drawn with wax.
Not the most obvious, but no less cool way to create an invisible card using wax. A big plus for the safety of such a riddle. It is also done using a stencil (the method is described above), only wax crayon is used instead of ink. The easiest way is to take a piece of candle. We don’t really recommend candles from a birthday cake - they are filled with dye on the outside, which can leave a mark on the paper and the card will turn out to be quite visible. Take the most ordinary white candles without dyes. Also trace the contours of the stencil with wax and the card is ready. To solve it, it is best to use a simple soft pencil - players just need to shade the entire piece of paper. The wax will remain undrawn and the map will appear. If you want to complicate the task, give the players a new pencil and sharpener, let them create a “decoder” for themselves, and at the same time practice their motor skills.
A little more troublesome than using pencils, but brighter, you can “develop” such a map with watercolors. You just need to paint over the sheet.
Another unexpected solution for developing a wax card is to hold it for a few seconds over a switched-on electric stove (at minimum power and under the supervision of an adult, of course). The heat will melt the wax and appear on the sheet.
Suits
Dear parents, without fanaticism. This is a pirate-themed children's party, and kids don't like tight clothes that are hot and uncomfortable to run and play in. For example, heavy high boots or a leather hat are a real nightmare for an active child. But newspaper accessories, assembled in five minutes, will not look very festive in the photo.
Don't try to dress the little pirate spick and span. Some disorder and even tattered costumes are welcome! A girl can create a creative mess on her head by braiding several braids with multi-colored rubber bands. For the boy to dishevel his hair, draw a bruise, a mustache, a beard.
We offer simple options on how to dress for a pirate party without spending a lot of money. Top: long T-shirt or T-shirt with stripes - blue, red, black. If it’s a shirt, then it’s white or “grimy” gray/beige. Gather the puffy cuffs and collar with elastic. Bottoms: dark wide trousers, loose shorts or a skirt. For a boy, you can sew a short vest or a long, open camisole. For a girl - a dress with a corset, frills and flounces, retro. For ideas, look at the photos of pirate costumes available for rent.
It is better to make the tops of the boots fake , from thick fabric. It is advisable that they be removed - with elastic, Velcro, buttons from the inside out. If it’s hot indoors or outdoors, after a few photos as a souvenir, the boots can be unfastened:
Of course, a costume would be incomplete without important pirate accessories and recognizable elements:
- wide belt (a long thin scarf will do), belt with gold buckle;
- fake rivets, chains, lacing;
- eye patch, sleeve hook, skeleton skulls (keychains, drawings, stickers on clothes, transferable tattoos);
- spyglass, saber, pistol. Surely there are some “weapons” in your home collection. If not, make one from cardboard and paint it with silver/gold paint;
- bandana and/or hat. They cost pennies in stores for organizing parties, but it’s easy to make a paper hat with your own hands (with an elastic band or two parts glued at the edges):
A real pirate cocked hat can be assembled from an old baseball cap and a wide brim . Cut off the visor, sew on the “steering wheel”, bend and sew the brim at three points, as in the photo below. The top of the head will be almost invisible, but you can paint it or cover it with fabric in the color of the hat brim. Decorate with a frill around the edges, insert a dashing feather or draw a skull. You will get a hat like this:
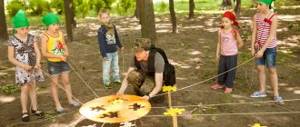
Orienteering task
Not quite a map in the usual sense, but the topic is very similar and can easily replace a task with a map, so we’ll also talk about options for such tasks.
Cossack robbers
The easiest way to navigate is with arrows on the ground. You can also organize it at home if you have a lot of space or several floors. Draw arrows, preferably not too often. In the house you can glue arrows, for example, with electrical tape on the walls, floor, ceiling - this is safe for wallpaper and nothing will be damaged. For the street, you can use chalk or sticks (if everything happens in a wooded area). Arrows lead from the players' point to the next cache point, everything is simple here.
Video card
This idea is not suitable for home use (why it will become clear later), but for the street, especially unfamiliar areas, it is just what you need. How to do it? Take your phone, turn on the camera and follow the route from the start point to the finish, filming everything in one take. The shooting principle is as follows:
1. At the starting point, shoot some recognizable object that is located right at the starting point.
2. Turn the camera in the direction you will go further for a couple of seconds and lower it to your feet. Walk in a given direction, taking off your legs.
3. As soon as you reach the turn, raise the camera, shoot some recognizable object located right here, turn where you want, focus on your legs again, etc.
4. When you reach the final point, do not raise the camera. You can point your finger in the frame where the hint is hidden (hold your finger in the frame for 3-4 seconds).
That's all. All that remains is to upload this video to Youtube. There it is advisable to speed it up and add music. This can be done directly on Youtube. You can also edit the video on your phone, for example, in the free InShort application and then upload it to video hosting or simply send it to your email (and in the previous task, make a request for access to this email). Options for how to give players access to this riddle will be left to your discretion.
For example, look at how to hide 4 clues at the dacha: on a swing, in the door of a bathhouse, at a children's sports complex and in a children's house.
Photo orientation
Everything is the same, only easier to organize. Instead of videos, photographs and text explanations are used. It is important to take photographs that are not obvious; you could only understand what they depict when you were in the place where the picture was taken. A very popular type of orientation for city quests, because... the city has many architectural features, unlike the same forest, where each tree is similar to the previous one.
So, what might a hidden route in a dacha look like:
1. Go to the starting place (for example, this is the porch of a house).
2. From the starting point, go down 5 steps and take 15 steps forward until you see this item:
3. Near it, turn left and walk until you hit this object:
4. Turn right and go towards the large building with this on it:
5. Next, turn right and follow the buildings until you meet this door on the way:
6. Stand with your back to the door and follow the object about 35 steps.
7. Standing near this object, find the following building nearby:
8. Enter it and look around. Hint here:
Using this clever chain, children will find the next clue in the quest, a piece of a map, or a final note (depending on the purpose of the quest). Focus on the age of the children; the older they are, the more complex the objects you can guess and the more unrecognizable you can photograph them.
We think the logic of this task is clear to you. Children aged 8 years and older cope with this task without difficulty.
For younger participants (from 5-6 years old, when they know letters), a simple photo quest with printed photos is suitable. For example, we hid a bag of lollipops in a woodpile at the dacha. We printed out 5 letters of the word “firewood” and laid them out around the area, photographed each one and hid the photos (except the first) along with the letters. Then we give the children the first printed photo:
They guessed it and ran to the gate, and there in the door, besides the first letter D, there was a second photo:
We found the second letter P, and with it a cache of a new letter:
We took “O”, and with it a photo of the new cache:
And a photo of the last letter, let’s find it too:
We put together the word “firewood” and run to look for sweets!
Map as a basis for a quest
If you need to do a small quest around your apartment or in the yard, a map is an excellent basis for such a game. There can also be a great variety of application options; we’ll tell you about some.
Collecting artifacts on the map
The point is that at the start, players are immediately given a ready-made map, on which many hiding places are indicated. Each of the marked places contains an artifact that will be useful for solving the final task. In a simple version, these can be letters printed on paper from which players will have to assemble an anogram. In a more complicated version, these could be the keys to small padlocks that lock the chest with gifts. Any handy dad can build such a chest in one visit to a hardware store and a couple of hours.
We only recommend that you approach the design of such a card creatively, for example, design it in a party style. theme of the birthday boy’s favorite or simply beautiful. You can draw both by hand and on the computer, it all depends on your abilities and availability of free time.
Collecting the map piece by piece
Players collect the map piece by piece, receiving a new piece with each completed task. Let’s say there are six such tasks in your quest. This means that after completing the sixth, the players will have 6 pieces of the map in their hands, which they will fold and receive the route to the treasured gift. Design options for such a map can be seen above; you don’t have to just draw it on a piece of paper.
Quest from cards
Another option is when navigating on a map is the only task of the quest, and the game itself consists of finding new maps indicating new places. For example, players receive a card that shows the area in which the next card is hidden. Here it is better not to indicate a specific point, let them search within a radius of a couple of meters. It turns out to be a very simple and dynamic game of orientation and search. Such a quest won’t take much time, but the children will run around and play enough. This option is ideal for players 4-6 years old.
A few more thoughts about cards
If we talk about large-scale quests, for example, about a city quest, then any mapping service, be it Google, Yandex or 2GIS, can become the basis of the game; all that remains is to “screw” the logic for encrypting points and tasks to them. Such quests are usually created for adult teams and often use street intersections or coordinates.
We hope that we have directed your thoughts in the right direction and then you can easily find a suitable map option for your quest. Well, if suddenly you still don’t know about the existence of ready-made quest scripts that save hours and days of your time preparing home quests for the price of a couple of mugs of coffee, then you are welcome to the scripts section.
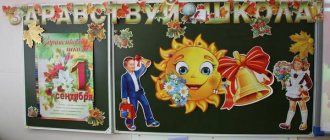
Photozone
Thematic background with a pattern or tantamaresque. It’s easy to make with your own hands, using a funny picture as a model. Draw, cut out “windows” for faces. A simple example that an older child can repeat.
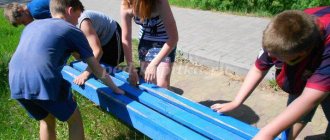
You can make a real pirate ship! Let it be made of cardboard, but with masts and sails! Take the time to paint the boat beautifully – it takes an hour, and the difference is noticeable.