Selecting size and shape
The casket, in which guests will place monetary gifts during the wedding celebration, should look impressive and be as convenient as possible. To ensure
that this accessory does not catch the eye of everyone who will be present at the celebration, it is important to choose its size correctly. A chest that is too small will make it difficult to collect envelopes and cards, and a chest that is too large will stand out, which will provoke a variety of ambiguous conversations.
In addition to the usual convenience, the size of this box is important due to the safety of the contents. A container that is too small can easily be stolen while guests and newlyweds are busy.
The optimal dimensions of a money chest are 20-30 cm with a height of no more than 20 cm. Such standards are designed for a ceremony not exceeding 80 guests. If the wedding is planned to be very large, then you can increase the size of the product or provide several drawers for financial gifts to the newlyweds. The size depends not only on the number of guests, but also on the shape of the chests.
The most common option is a round and square greeting box, purchased or made by hand. Usually, preparing for a holiday takes quite a lot of time, so making such an accessory will not be difficult, especially if you know what exactly needs to be done. If you want something unusual, you can design the product in the shape of a heart or a barrel. If the couple is already expecting their first child, then they can make a stroller-chest, and those who are planning a trip after the ceremony can create a box in the shape of a car or a ship, which will look original and interesting.
Depending on the purpose of fundraising at the wedding, the color of the product may also differ. For future children, the box can be blue or pink, taking into account the gender of the future baby. For travel, the chest can be colorful and bright, like the emotions that a couple should receive on vacation. In case of collecting finances for the family hearth, a pure white color is usually provided, symbolizing purity and harmony, which is so necessary and important in family life.
Decorating tips
Decorating a chest for a wedding is one of the most important stages, since the perception of the product and its aesthetics depend on it. Incorrectly selected decorative decorations or their incorrect location will have the opposite effect from the desired one, and instead of a stylish and interesting accessory, the celebration will have an absurd attribute that will surprise everyone present.
For everything to work out the way it should be, it is important to follow certain rules
To decorate the joints and corners of the chest, it is better to use satin ribbons that are glued on top of the product
It is important that they have the same color as the material of the box itself. You can decorate the casket with decorations purchased in advance from sewing stores or wedding salons. When decorating the lid of the chest, it is important not to overdo it. Otherwise, the weight of the decor will be too great, and the upper part will begin to fall inward, which will spoil the entire impression of the chest.
- When planning the choice of decorative elements, you should adhere to the principle of combining contrasting colors, light colors on the product and bright accents in the decoration; this option will achieve the best effect.
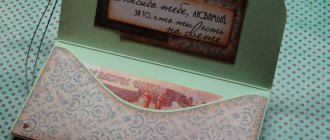
- To make the sides of the chest look original, you can place a photo of a young couple or a photo collage of them on them.
- The main elements used to decorate a wedding chest are ribbons, beads and rhinestones, which go well with a sprig of rowan, dried spikelets, original leaves and berries.
Chest diagram
Once the desired shape of the future wedding box has been chosen and all the materials have been prepared, you need to move on to the next stage - finding a pattern. It can be easily found on the Internet on specialized sites. Here are presented both diagrams of standard rectangular wedding accessories, as well as very unexpected and interesting options.
To save time, you can purchase a ready-made box from the material you like or simply use a regular small shoe box. By making a slot for banknotes and decorating it with ribbons, flowers and rhinestones, you can get a very attractive family bank for a wedding.
How to make it yourself?
To make a chest for money for a wedding, you need to know the general principles of this work, as well as the nuances that you will have to face in the creative process. The manufacturing scheme is quite simple, but for those who are creating such a product for the first time, it will be very useful. To make a chest, you can use a simple shoe box. During the preparation process, the front part is made slightly lower than the back part in order to imitate the appearance of the real product and replicate its closing system. When planning to create a wedding box for collecting cash gifts, it is worth choosing the right initial container so that it has the required dimensions, not too large, but not small, otherwise using the product will be problematic.
In addition to the base for the chest, it is worth taking care of the lid, which should be a decoration of the product, for which the best choice would be a figured design. As soon as the product is prepared, it needs to be decorated with fabric or paper, and then begin the decorating process. The wedding chest does not play a huge role at the holiday, but the newlyweds, as well as the guests who came to please the couple with their small gift, will be pleased to use a specially made container for this, which will complement the overall design of the room.
To make the chest truly beautiful and functional, consider a master class on how to make it. After this, you can get to work, because, understanding what and how to do, following all the instructions step by step, there is a much greater chance of getting what you want. A family chest for envelopes with money and postcards may have different dimensions, shape, colors and decor, but the basics of creation will be approximately the same. So, to make this accessory for a wedding, you need to follow a number of steps.
Preparing cardboard. A template of the required size is drawn on it, from which the base of the chest will be created. When everything is drawn, you need to carefully cut out the parts, leaving room for allowances, thanks to which you can glue the structure together. Allowances and other folds must be carefully folded back, making them completely even. The last step will be gluing the seam allowances into a single composition using glue or tape
It is important to do this in the inside of the box so that the appearance of the product is not damaged. To strengthen the entire structure and make the chest more reliable, you need to cut out a cardboard strip, thanks to which the internal corners are additionally glued together. This allows you not only to secure the allowances, but also to hide them.
Popular articles Polyethylene toy “Chick”
The next step will be to work on the lid, which usually has a three-dimensional shape on the chest. In order to bend thick cardboard beautifully and, most importantly, evenly, giving it a semicircular shape, you need to make several longitudinal strips on the inside of the product. It is worth remembering that excessive force when pressing will cause a hole to appear in the product, and everything will need to start again. As soon as you manage to achieve the desired shape, you need to attach the volumetric part to the base, which will allow you to get the desired chest
It is better to choose the internal part as a place for fastening; this will avoid visible joints and gluing points, which will make the appearance more attractive. Once the base of the chest is ready, it’s time to move on to a very important step - cutting holes for envelopes and postcards. It is very important to correctly measure the length and width of the window into which guests will lower what they have prepared for the newlyweds
It is most convenient to make this hole using a stationery knife, which easily and quickly cuts through the cardboard without deforming it, as scissors can do.
The next step is to decorate the box using paper or fabric. For this procedure, it is necessary to measure the lower part separately and outline it, as well as the top. The first step is to decorate the lid, and then the rest of the chest.
On the roof, special attention should be paid to the hole, which should be cut as carefully as possible, and the edges should be treated with a lit candle. This stage requires maximum accuracy and attention, because the appearance of the finished product depends on it. When the chest is completely decorated with paper or fabric, the final stage begins, which involves decorating the product with all sorts of decorative elements designed to improve the appearance and bring it in line with the style of the event.
Money box in the shape of a heart
If you have a ready-made heart-shaped box, use it. If not, we do it ourselves. The bottom and top part are cut out of cardboard in the shape of a heart. Then you need to cut out long strips. These are the side walls. The height of the box depends on the width of the stripes. Cut a hole on the top for money. Glue all the parts together and decorate the finished form.
Example of a heart-shaped money box
Such money boxes are used not only at weddings. They can also be considered as gift boxes. They are made according to the same principle, only without holes for money. If you make beautiful wedding chests, then you can try selling them. Sales points ─ wedding salons. There are also special forums. The cost of the most primitive money box without any frills is approximately 600 rubles. A “cake” decorated with ribbons and rhinestones costs 1,650 rubles. You can make a trial batch of several different boxes and negotiate with the wedding salon to keep them for sale. Of course, it is unlikely that you will be able to earn a million, but it is quite possible to receive a good income.
It is customary to give wedding gifts to a newlywed couple; this tradition dates back to ancient times. A popular gift is considered to be a certain amount of money so that the newly-made family can decide for itself what they need to buy. However, donated banknotes must be carefully folded so as not to lose anything. For such purposes, beautiful wedding chests were invented with a cut hole into which envelopes with money can easily be inserted. It is not at all necessary to purchase such a chest if you have minimal creative abilities.
Choice of color and shape
A wedding chest can have any color design, from snow-white to black. It all depends on the wishes and preferences of the heroes of the occasion. However, if this accessory is made for a specific purpose, it is necessary to choose the right color:
- If the chest is used to collect money for a future son, this accessory should be made in blue or light blue.
- If you are collecting funds for your future daughter, you should give preference to shades of pink.
- If the money box is intended to raise funds for a honeymoon, it should be bright and colorful.
- If this attribute simply acts as a family bank, it is made in white or another neutral color.
In addition, depending on the purpose of collecting money, a certain shape of the chest for the wedding is chosen:
- For future children - in the form of a stroller or cradle.
- For travel - in the form of a car, plane or map.
- For a house, car, etc. - in an appropriate form illustrating the desired object.
Wedding chest in vintage style
If the base was painted with white paint, then you can use the decoupage technique for decoration:
- Print out wedding-themed pictures and carefully cut them out along the outline.
- Apply PVA glue to the areas on the chest where the pictures should be located, attach the image there and carefully smooth it with a brush.
In this way you can cover the entire box or individual sections of it. In the latter case, additional decor would be appropriate. For example, you can make spectacular decoupage in vintage style:
- Print out a joint photo of your future spouses or two separate ones with each of them. It is best to stylize the photograph in advance as antique.
- Cut the photo into an oval shape.
- Glue to the front edge or sides.
- Make a frame of white pearls or clear crystals around the photo.
- Attach a neat bow to the bottom or top.
- On the empty areas of the box you can paste clippings from old newspapers, sheet music or books with romantic poems and quotes.
- As additional decor, you can use lace, satin ribbons in pastel shades, ready-made beads, and feathers.
- Using silver or gold glitter (contour paints), depending on the design style, make a thematic inscription: the names or initials of the newlyweds, the wedding date or something symbolic.
The lock for such a chest should be designed in the same style; the simplest thing is to simply paint it with silver or gold paint, stick a few beads or crystals on its front side.
By the way, the clasp of a chest for a wedding can be made magnetic, and on the outside this place can be marked with a beautiful bow, brooch, flower, etc.
Types and forms
Money chests can be made in the shape of various geometric shapes: square, circle, oval. Can be made in the form of objects: a house, a chest, a suitcase, a heart. The gift is decorated in accordance with the wedding theme. A close friend of the bride or one of the relatives is responsible for preparing the creation and decoration of the box. A family fundraising piggy bank will bring fun and convenience to the celebration for guests and donors. The wedding “treasury” can also be used as a box for storing envelopes, cards, jewelry and other small gifts.
Let's look at a few ideas.
Making a chest with your own hands
Most couples use standard trays where guests place all their gifts and envelopes. But this option is completely unsafe and not original. Therefore, we advise you to work a little and create a box with your own hands. Choose a design in the form of a rectangle or a suitcase.
The casket can be decorated with various decorative elements. If you want to create a box that is as close as possible in appearance to the chest, then paint it white, black or brown. In order for the product to look original, we recommend decorating the casket in an unusual shape.
Even products with complex shapes do not need the help of a craftsman; everything can be done independently.
Choice of color and shape
Regarding the shape, options in the form of a fairy-tale casket or a magic chest look especially harmonious. All this will resemble a cozy family “nest”. Regarding color, we recommend choosing fabrics in the same color as the wedding. Nowadays, most couples create a wedding in one color. Therefore, even small decorative elements must be in the same shade.
Materials used
To create a unique casket, you will need the following materials:
- high-quality glue;
- cardboard box of suitable size;
- stationery knife;
- stapler and tape.
Of course, buy various beads, ribbons, and stones in advance. Velvet fabric may also be required for the external and internal decoration of the box.
Money chest diagram
To create a chest, you cannot do without a special diagram. It is not needed only if you are creating a casket from a shoe box, since it already has the required format. If you haven’t found a suitable box, you will need to take a large sheet of cardboard and select a suitable diagram for the box. Then draw it on the surface and cut it out. Once completed, you will need to connect each element to each other using high-quality glue, a stapler or tape.
Beautiful examples
To understand exactly how to make a wedding chest, you need to see it.
Options for sizes, shapes and colors will allow you to decide what exactly you would like for a specific event. The color for the chest is usually white, although there are other options that differ significantly in color. The fabric used to cover the box is usually satin, but in some cases it may not be used, decorating the product with ruffles and frills. The material that already has embroidery will look very beautiful. If the casket is made in white, it can be decorated with a voluminous flower or bow in a cream or peach shade.
A wedding chest lined with material with a pattern on it looks gorgeous. In this case, it is best to use light colors: white, flesh, gold, peach, and the design should be of a more contrasting shade. Due to the fact that the box itself is already quite bright, a lot of decorations should be avoided, so having several bows in the same color scheme will be ideal.
Lovers of something unusual and extraordinary will love the casket, made in contrasting colors. It can be red, purple, burgundy, pink and more. The main thing is to dilute the contrast of the main product with the help of auxiliary elements. Lace, which is usually white, copes best with this task. You can decorate the casket with a bow or flower in matching shades.
For those who want to stand out not with color, but with shape, the ideal options would be a house, car or ship; you can also make a baby stroller. Such products usually have a hidden meaning, allowing you to understand what exactly the newlyweds are raising money for. The color scheme here will also be light, and the decor is soft and discreet. The products can be complemented by small flowers, pearl beads and flower designs made in a more contrasting color.
To learn how to make a wedding treasury in the form of a congratulations chest, see the following video.
Product selection criteria
Various materials are used to make a wedding bank: thick cardboard, plywood, wood. Fabric, decorative paper, artificial and fresh flowers, rhinestones, ribbons, and beads are used for decoration. You can consult with the bride in advance, and she will help you decide on the style of the accessory in accordance with the wedding concept.
But the main thing is that the money box looks elegant and is as comfortable as possible
When purchasing a product, you need to pay attention to the following criteria:
- Size. When choosing the size for a wedding bank, you need to consider the number of invited guests. So, if about 50 people come to the celebration, it is enough to purchase a medium-sized box (about 20 cm in height). With a larger number of guests, preference is given to a more voluminous product.
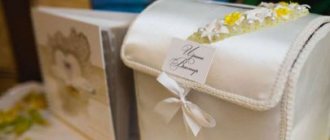
- Form. Nowadays, a variety of forms allows you to choose a wedding attribute for storing money to your liking. This could be a classic box, an old-style chest, or a cardboard cake with several tiers, made in the same design as the edible one.
- Style. A chest for storing money at a wedding can be made in any design and color. The main thing is that this attribute is combined with the wedding decoration of the hall and fits harmoniously into the festive interior.
- Safety. It is worth taking care of the reliability of the box. A big plus is the ability to lock it. When there is a large crowd of people at a wedding event, it is not always possible to keep track of the safety of funds.
An accessory made of thin cardboard may not withstand constant use during the celebration. Each of the guests will definitely want to touch the original wedding attribute and make their contribution in the form of a cash envelope. Therefore, it is better to give preference to denser materials.
Master class on creating a wedding treasury
If you don’t have a ready-made box, use a template to cut a blank out of cardboard, then glue it together and proceed to further work.
Popular articles Potholder “Apple”
- Use a pencil to mark a semicircular outline on the side edges and cut off the excess.
- Cut the front edge flush with the bottom point of the round part.
- Using a ruler, crumple the lid every centimeter so that it takes on a semicircular shape. The length should be such that it slightly overlaps the top of the front edge. If the length is not enough, then it can be “increased” using cardboard and glue.
- Using masking tape, glue cut-out cardboard elements, semicircular on one side and straight on the other, to the sides of the lid.
- Tape all edges of the chest with masking tape.
- Make a hole in the lid for money approximately 5-7 mm wide and no more than 15 cm long.
- No matter how beautiful the base is, in its original form it is not suitable for a wedding, so the box needs to be covered. Leather, any textiles or designer paper are suitable for this. Here the flight of imagination is not limited.
Decorating a money chest
Particular attention will need to be paid to decorating such an attribute. Here you should not save and choose the cheapest; on the contrary, if you buy ribbons, then choose the most expensive and wide ones
In addition, we recommend combining satin ribbons with beautiful velvet. If joints or glue are visible somewhere, take a glue gun and decorate the seams with beads.
If you are worried that you won’t be able to make the money chest for your wedding as luxurious as you would like, invite your relatives and your significant other to create it.
Money box for a wedding: master class
The next box we offer is shaped like a two-tier wedding cake. To create the casket in question, you need to find a round box, for example, from a tea set or chocolates. If you don’t find the desired shape, then make a round layout from cardboard. Cut a hole in the lid of the lower tier, moving 3-4 cm from the edge, so that the cake inside is hollow. At the top part with a smaller diameter, make a slot for money. Combine both elements to form a cake shape. Then cover the box with decorative paper or wallpaper. Mask the joints with lace. Do the same with the top hole. Add beads, rhinestones, and small accessories to the decor. Flowers made from satin ribbons made using the kanzashi technique look original.
Master class on making a box
You can make a ring box for your wedding with your own hands, with a little imagination and effort.
The result will be an exclusive accessory that will attract the attention of guests and remain a long-lasting memory for the newlyweds.
What materials will be needed for work:
- two sheets of thick A4 cardboard;
- any glue (“Moment”, PVA);
- scissors;
- satin, lace;
- decor (beads, seed beads, artificial flowers);
- foam rubber
When everything you need is prepared, you can start making the wedding box:
- Apply the template of the future box to the cardboard, having previously printed it from the Internet. The bottom will be square (6 cm on each side), the walls will be 4 cm. Leave an allowance of one and a half centimeters.
- Make a lid template in the form of a square (6.3 cm on each side), height – 2 cm.
- Cut out the blanks, bend along the lines, forming a box.
- Glue the base, then the lid of the product.
- Cover all sides and the lid with satin fabric, decorate the box with beads, flowers, beads or any other suitable decor.
- Finally, beautifully lay out the material from the inside. Typically, foam rollers wrapped in satin fabric are placed in the box, where the wedding rings will be placed.
We offer another master class on making a wedding box from a wooden blank.
What you will need:
- preparing a future wooden box;
- acrylic varnish and paint (brown and ivory);
- bitumen varnish;
- a piece of linen and cotton fabric;
- lace;
- decorative tag with flowers.
How to make a wooden box:
- First, remove all metal parts of the workpiece.
- We cover the sanded product with paint so that it looks as if it is dirty. The brush should be directed along the grain of the wood.
- After complete drying, rub the places where you “dirty” the box with wax (you can use a regular candle).
- Paint all parts with ivory paint and let dry.
- Use sandpaper to go over the box from all sides to achieve the effect of artificial aging of the item.
- Cover the box with varnish, wait until it dries, repeat several more times.
- Screw all metal parts back.
- Glue a decorative tag to the lid as decoration (you can purchase this from a craft store).
- All that remains is to sew a pillow for the rings, which needs to be filled with filler and decorated with lace. Place the cushion inside the box.
To make a round box for wedding rings, prepare the following materials:
- preparing a wooden box;
- white and silver paint;
- white satin;
- padding polyester;
- ribbons;
- artificial flowers.
Step-by-step instructions for making an elegant wedding box:
- Paint the base of the workpiece white and the lid silver. After drying, apply another layer of paint.
- Sew a pillow from satin fabric to the size of the bottom of the box, stuff it with synthetic padding or any other filling.
- Coat the bottom of the accessory with glue, carefully insert the pad, and press firmly.
- Glue artificial flowers onto the lid to create an elegant arrangement. You can add a ribbon bow, beads, beads or any other decorations.
How to make a wedding treasury with your own hands in the form of a cake
You can create a wedding treasure in the form of a birthday cake. For this you will need cardboard and two plates of a large and a smaller diameter, like stencils.
Cut out two circles of larger diameter and two smaller ones from cardboard, connect them using a long sheet of cardboard in layers in the form of cylinders.
Cut a hole in the top of the larger cylinder 2cm smaller than the other cylinder and glue it on top. The two-tier cake is ready. Don't forget to make a hole in the top circle. Decoration is arbitrary: ribbons, braid, flowers - any compositions suitable for a “sweet” treasury.
If you are not shy about your guests, then you can make an open treasury, for example, in the form of a basket. You can purchase a wicker basket and decorate it in the colors of your wedding, or make it yourself from cardboard and a pattern.
To do this, you need to make a drawing and then fold and glue the basket; it can be square or round - it all depends on your desire. The basket needs to be decorated both inside and outside. The handle can be made of wire or thick cardboard. In both versions, you can tie it with ribbons, yarn, braid; don’t forget to make a decorative element at the place where the handle is attached to the basket to disguise the transition.
If your imagination does not generate creative ideas, and it is difficult for you to imagine how to make a wedding treasury with your own hands, then look at the photo or video master classes that can be easily found on the Internet. In them you will see a lot of unusual ideas, you will be presented with step-by-step instructions and various methods for creating a wedding treasury from materials available in any home.
Comfort and atmosphere are built on details, so take care of such an important attribute as the wedding treasury, make it unusual and reliable, because this is your foundation for your future family life
Where to begin?
To make a chest with your own hands, you will need your own imagination and some free time. Such an attribute must be done carefully and with love, as it will become the central element of the celebration and will symbolize the future treasury of the newlyweds. By putting your whole soul and good intentions into its production, you can attract financial well-being to the family.
Before you start making a money chest, you need to determine:
- The shape of the future wedding chest: square, rectangular, barrel-shaped, heart-shaped, etc.
- Product color and size.
- What materials will be needed to make this holiday attribute with your own hands?
- Related decor.
Purpose of the chest
Nowadays it is customary to give money to newlyweds for their wedding. For the convenience of collecting donated financial amounts, beautiful boxes or special chests are used. They are unique symbols of the future financial well-being of a young family.
With the funds collected, the newlyweds can independently purchase for themselves what they think is necessary for their family life. Also, such a gift is very convenient because guests do not need to rack their brains over the question of what to present to the newlyweds for their wedding celebration.
According to an old belief, it is forbidden to give money to the newlyweds at a wedding. This may cause them financial trouble or bring them into some kind of trouble. Therefore, a special chest is useful for collecting money.
Chest decoration
A homemade wedding box can be monochromatic or combine several colors that look harmonious with each other. Among the most popular design options: the bottom of the product is made monochromatic, and the top is bright, with various decorative elements.
You should start gluing the box from its sides, smoothly moving to the lid. To do this, you need to take high-quality glue that can reliably attach fabric, metal and plastic to a cardboard or fabric surface. Do not neglect the quality of the glue, since a part of the chest that is not securely attached can fall off at the most inopportune moment.
When decorating a chest, you can use the following tips:
- It is recommended to decorate the sides and joints on the chest with satin ribbons, the color of which matches the shade of the fabric for the lining.
- To decorate the chest, you can use ready-made options that are offered by wedding salons and handicraft stores.
- The lid of the jewelry box should not be too heavy, otherwise it will begin to sag inward.
- A winning option would be to use contrasting colors and shades, for example, white fabric for lining the product and red ribbons for decoration.
- The sides of the box can be decorated with photographs of the happy newlyweds.
- For decoration, you can use original decorations: small tree branches, dried grass, flowers, leaves and berries. Thus, you will not only get an interesting composition, but also be able to surprise your guests with your skillful handicraft.
Popular articles New Year's paper balls
You can make a beautiful and original chest for money for a wedding with your own hands. To save your time and protect yourself from possible failure, you can make a wedding accessory from a cardboard shoe box and decorate it with blanks purchased from a specialized store. It will take no more than two days to produce and decorate such an attribute.
Wedding chest: tips for choosing
Naturally, you can go to the nearest wedding salon and buy the first wedding chest you come across. But will it be appropriate for your celebration? The most important advice for choosing is that money chests should match the theme of the wedding. It’s up to you to decide what the match will be – color, shape or design. And we offer you several original ideas with the help of which an ordinary wedding chest will turn into a creative find.
An unusual shape is an extraordinary attribute
A great way to diversify your wedding accessory. Instead of the usual chest, you can choose interesting shapes:
- The house is an opportunity to hint to the guests in an original and unconventional way what the newlyweds plan to spend the donated funds on.
- Heart - will add romance to a wedding celebration. Looks great both in red and in less flashy colors.
- A round chest is a simple but very versatile accessory.
- Multi-tiered form – an opportunity to make the money box compact and spacious.
What else should you pay attention to?
- A game of contrasts is the right solution for a wedding in a certain color. Add brightness to your chest and it will sparkle with new colors.
- Material – try to find or build a money box from non-standard material. Typically, designer cardboard is used for creation. What do you think of the idea of a wooden chest for a wedding? Wood products have been trending lately and look very harmonious. Ideal for a rustic wedding.
- A piece of yourself - add your photographs to decorate the chest and this item will become a little closer to your heart.
- A copy of a wedding cake is an interesting and original idea. Sometimes it is almost impossible to distinguish a money chest from a cake.
Tips for creating a surprise box
- If you don't have patterned paper at home, you can use old wallpaper or any pieces of kraft paper for scrapbooking. You can also use photocopier colored paper or old postcards. The main condition is the compatibility of materials. Master classes on color combinations can be found on the Internet.
- Choose a color scheme and use colors that go together. If you decide to make a box in pastel colors, use only muted and delicate shades. In this case, it is better to avoid bright colors.
- Don't forget to trim the edges of the paper with curly scissors to make the craft as personalized as possible. Your imagination can work wonders, so don’t be afraid to experiment!
- Use shape punches to create holes in tags or create patterns along the edges of cardstock.
- Do not apply acrylic paint with a brush - too thick a layer can ruin the paper or cardboard. It is better to use a foam sponge, which will not leave dirty prints and distribute the paint evenly over the surface. You can take advantage of a step-by-step master class on using watercolors in scrapbooking.
- Before you begin, cover the surface with old newspaper to avoid staining your work area.
- Don't forget to be in a good mood! The recipient will be much more pleased to receive a gift made from the bottom of his heart.
Treasury-house
This design symbolizes the united life of the young, perhaps the desire to acquire a new day. The treasury turns out to be beautiful, unusual and will delight you with its appearance for a very long time.
You can come up with a pattern yourself or take a ready-made one. The lid is hinged. You can glue it at one end to the wall. The house is decorated with windows and doors made of colored paper, ribbons, and fabric. Photos of the newlyweds are also suitable for decoration. The material for making the house can be cardboard, whatman paper or plywood. If whatman paper is used as the base, then it needs to be reinforced with finishing material, for example, covered with thick wallpaper.
Article on the topic: Bracelet made of beads: master class with video and weaving pattern
Money chest
If you have the desire and time, you can create a wonderful wedding chest. For this you will need:
- cardboard box,
- glue,
- scissors,
- paper knife,
- scotch,
- creasing tool - it can be scissor rings, an ice cream stick, a plastic card, etc.
- paper or beautiful material for decoration (you can take beautiful wallpaper),
- decoration elements - lace, beads, etc.
- An outline is drawn on the sides of the empty box, outlining the lid of the chest.
- Two lines are drawn on the front side of the box: one connects the lower points of the arcs on the sides, the second indicates the height of the lid of the product.
- By cutting off unnecessary elements, a lid format is created.
- There are strips running along the inside of the lid at a distance of approximately 1.5 cm from each other. This is necessary to create a beautiful bend.
- Using a sharp knife, cut off part of the box along the bottom drawn line on three sides - the back side remains intact.
- The lid can be trimmed a little - there should be a 2-3 mm gap between it and the bottom of the chest.
- The lid parts are secured together with tape. A stapler can be used for this purpose.
- The excess part of the lid is removed with scissors or a sharp knife.
- On the inside of the upper part, draw the outline of a slot for envelopes with money, which is then carefully cut out with a knife or scissors. To make sure the gift gets into the storage, you should purchase a standard envelope and try to see if it will fit into the slot.
- Now you can start covering the chest. First, you need to cut out one large piece that will cover the front wall and two sidewalls. Don't forget to add allowances - about 5 cm on each side. The height will be equal to the height of the wall plus the same 5-6 cm for the gates.
- After applying glue to the cut out rectangle, paste over the front part and two side parts, after which the remainder is folded onto the back.
- Cut the corners, tuck and smooth to remove air bubbles.
- Cut out special blanks for the sides of the lid and glue them.
- Having taken measurements of the bottom, lid and back wall, cut out parts of the appropriate sizes and then glue them on.
- A slot is made in the pasted lid by bending the ends of the paper into the prepared slot for money.
- If the lid of the box turns out to be too heavy and constantly tries to lean back when opening, then you can glue a piece of tape from the inside to one of the sides. You need to measure it in such a way that it prevents the lid from falling.
- The next step is to glue the inside of the chest. This can be done either with the same decorative paper or with beautiful material. True, the last option will have to spend a fair amount of time.
- Take a strip of corrugated cardboard with the following dimensions: its width is 5 cm, and the length is the length of the front wall plus 2 times 2/3 of the length of the sidewall. This element is covered with the same paper as the entire craft.
- Having coated it with glue to the middle, glue the strip inside the chest.
- Use small scissors to carefully cut a hole for the envelopes.
- And now you can give room to your imagination - anyone can decorate the chest with whatever they can and want.
For a wedding, you can make several of these crafts: decorate a chest with blue to collect money “for a boy,” red for a “girl,” and white for gifts for the newlyweds or proceeds from the sale of a birthday cake.
| Injections are a thing of the past! It's so simple! You will be shocked... Read more >>> |
| This is how Kamenskikh loses weight! The recipe from Nastya Kamenskikh blew up the Internet! |
Video: how to make a money box for a wedding with your own hands
For clarity, we recommend watching a video with step-by-step master classes.
DIY box for collecting money for a wedding.
It all started with the fact that I felt sorry for throwing away boxes from under glasses. But once you understand the principle of operation, you can turn almost any box into a cute wedding money chest.
There were partitions in this box that I got rid of. I brought the box to the same look as in the photo!
On one of the sides we draw this outline, typical for the lid of a chest. You can stick to any size. You can do it “by eye”, whatever suits you! We do the second side in exactly the same way! but on the “profile” we draw two stripes: the first connects the lower points of each arc on the side panel, and the second is the height of our future cover.
Now we take scissors in our hands and cut off the “excess”. Create a “bulge” for the lid. I think the photo shows what I mean. Next step: the lid of my box is quite dense and just doesn’t want to bend nicely. Therefore, with the blunt side of the scissors I make these grooves (on the inside of the box). The distance between the beards is arbitrary - mine is about 1.5 cm.
Now I cut along the bottom line in three. to the parties. I did this with a sharp knife.
“Finishing” the lid of my chest. Personally, I take adhesive paper tape, which is sold in hardware stores called construction tape. Well, I take exactly that, tear off the pieces and use them to secure the lid parts together.
This photo shows it better. I cut off the “extra” part of the lid with scissors (you can also use a knife). I connect everything with the same adhesive tape.
Here you go. Something is already emerging.
If money is thrown into this chest, then it’s time to think about the “hole”. To do this, I draw contours on the inside of the lid and cut them out with a sharp knife.
Tip number 1: if you simply cut along the “bottom” line, then after we cover our chest it will not be able to close well. Therefore, it is worth increasing our slot, as I tried to show in the photo, to about 3 millimeters.
Let's start gluing our chest. It was for this chest that I again picked up the wallpaper that I bought especially for this. I cut off the first piece: length = two widths of the side walls + the width of the front wall + two folds (I have 5 centimeters each... but less is possible). Height = wall height + two folds.
I glue it with glue from a spray can (as in the photo), but this is my personal choice!
I start gluing it: first the front and two sides, then I fold it over the back, then I cut it at the corners and tuck it in. After everything, I smooth it out, expel the air and press it well again.
Next step: I trace the sides of the lid and cut out these blanks.
I glue the sides of the lid.
Having measured the width of the chest, I cut out the next part. It will need to be pasted over: the bottom, back wall and lid. So you will need to calculate the length taking into account all these details.
While the glue has not yet hardened, I make a cut like this.
This is how the hole for envelopes looks like.
At this stage, our wedding money chest looks like this.
Tip number 2: If you feel that the lid of the chest is a little heavy and is constantly “trying to fall off” when you open it, then before gluing the inside of the chest, glue a piece of ribbon on one side of the inside as in the photo. Try to find the position of the lid in which it already “leans back” and in this position we glue such a ribbon. After this, you can safely start gluing the inside of the chest.
I figured that my lid wouldn’t “fall off” anyway, so I removed the ribbon and started covering the inside with the same wallpaper. If you want to tinker, you can decorate the inside with material - it turns out beautifully, but it takes a little more fiddling.
How to paste it over - I don’t think it’s worth going into too much depth. I will make a cut for the envelopes later, when the glue has dried.
Now we cut off a cardboard strip (I have about 5 cm wide and long = 2/3 of the width of the side panel + width of the front wall + 2/3 of the width of the side panel).
“Trying it on” from the inside. as in the photo. The cardboard sticks out about 2 cm above the edge of the chest.
I also covered this cardboard with the same wallpaper, and so that the “seam” was at the bottom.
I coat it with glue to about the middle and glue it to the inner wall(s) of the chest. I used nail scissors to cut a hole for the envelopes.
I pulled out all sorts of things from the bins that are associated with a wedding. I glued it with a hot gun and added doves and hearts. And.
DIY money box for a wedding. Detailed wizard.
Box with a surprise, master class
By following the step-by-step master class, you can make an extraordinary box with your own hands using the scrapbooking technique, which is sure to attract attention. The master class contains 13 steps, after completing which you will receive a beautiful box
Cut a square (30x30 cm) from cardboard. This base square must be divided into equal parts. To do this, you need to divide the sheet into 9 equal squares (10x10 cm). Using scissors, separate the four side squares from the cardboard sheet. You won't need them anymore. Using paste without ink or a knitting needle, press through the fold lines. There should be four of them in total. The side squares need to be folded towards themselves. Cut out squares (9x9 cm) from craft paper or photocopy paper of a suitable color and trim their edges with curly scissors or a hole punch. Use a glue stick to glue the finished cards to the base walls. Treat the empty space with acrylic paint. To do this, apply a little paint to a foam sponge and walk along the edges of the side walls. Decorate the bottom of the card-box for money with craft paper. It can also be covered with lace braid. Print or write half your wishes on square sheets (6x6 cm), trim the edges with curly scissors and glue to the walls of the money box. The walls and bottom can be decorated as desired. Now you need to make a lid for the box. To do this, you need to take a sheet of cardboard and cut a square out of it (12.2x12.2 cm)
Please note that you need to add two centimeters on each side for the fold. Press down the pencil markings and make 2 cm cuts on one edge of each side. Fold the indents inwards. Decorate the lid with craft paper, scrapbooking paper, ribbons and other decorative elements. Seal the edges. Place money and other small gifts into the box, connect the walls and close the box with a lid. Tie the gift wrapping with a satin bow.
Current wedding ideas
To create a miracle cake, you need 2 or 3 boxes of different diameters (depending on the desired number of tiers).
Detailed master class on making a “delicious” money cake:
- Using double-sided tape, small boxes are attached to large ones. The result is a tall and stable structure.
- The edges of each box are covered with white paper to make decorating easier.
- There is a slot on the top cover of the box for gifts.
- The cake can be painted with acrylic paints or initially covered with colored or gift paper.
- The edges of the tiers can be covered with lace or satin ribbon, beads or pearls.
- The money hole also needs to be decorated. Its design is carried out with the same material that was used for the edges.
The chest for collecting money for the newlyweds is ready.
The casket in the shape of a house looks fresh and fascinating. The form itself hints to guests that all donated funds will be used to purchase new housing. Creating a house will not be difficult. You will need a regular box. The roof of the house is made of a thick sheet of cardboard, which is folded in half. The entire structure is painted in one color. The house can be painted to look like a brick or use leftover wallpaper. The windows can be decorated with beautiful lace.
Video ideas for wedding houses for gifts
https://youtube.com/watch?v=-7RrskGYIgc