If you plan to give a large sum for a birthday or wedding, you can supplement the gift with a handmade envelope for money. Naturally, this is an ordinary shell in which there is something more valuable for a person, but he will still have pleasant feelings from such a gift. Money envelopes can be made from various materials and for different needs.
A selection of the most unusual texts
Whether it is worth signing a postcard that is intended for a monetary gift, everyone decides for themselves.
It may already have a congratulatory inscription: “Happy wedding day!”, “Congratulations on your wedding day!”, “Advice and love!” Additionally, writing a few words of sincere wishes on the money envelope is a good idea, especially if you use a humorous style. You can joke about explaining the purpose of the banknotes, for example: “To the future heir/heiress to the throne.”
Original signatures can be like this:
- Let there be as much money as you need, and we donate this for seedlings.
- Here's a contribution to the family nest egg.
- Here is what helps make life better and brighter.
- There are a few notes here for “haute couture” diapers.
- For financial freedom from salary dependence.
- Since money is evil, let this evil be enough for everything.
- Accept thousands of congratulatory greetings from us, my friend.
- Instead of a carpet and dishes.
- Here we take care of your wonderful mood.
For invitations
We offer several options for ready-made invitation texts that can be printed or handwritten in calligraphic handwriting:
Congratulatory inscriptions
You can put a beautiful postcard in the envelope with money, on which sincere congratulations and wishes will be written to the newlyweds.
Here are some examples of congratulatory inscriptions:
When going to a wedding, prepare in advance a beautiful envelope in which you place the prepared banknotes. A hand made envelope, made with love and diligence, will be remembered by the newlyweds for a long time. But even if you present a monetary gift in a purchased postcard, be sure to accompany it with sincere, warm congratulations and wishes.
https://youtube.com/watch?v=JZGvS5qkK3Q
Envelopes for wedding invitations
The bride and groom send invitations in advance to all guests who will be expected at the wedding ceremony. An invitation card is a traditional, best option. Envelopes for invitations that young people have made themselves will look especially tender. The postcards will remain intact in them - they will not be wrinkled, dirty, or torn. To make a cover, you can use a variety of materials: colored cardboard, paper, lace, fabric, beads, sequins. It is better to make a wedding envelope so that guests immediately understand in what style the celebration will take place.
Wanting to organize the upcoming holiday original and memorable, the future spouses try to think through every little detail, and make many accessories themselves, not only for the purpose of saving money. Unusual invitations look impressive and will surprise guests. It’s not difficult to make them yourself, but the work will require perseverance, painstakingness and imagination.
We offer a master class on how to make a simple, but at the same time unusual wedding invitation. What materials will you need:
- colored cardboard or paper;
- a simple pencil;
- glue;
- decorations: lace, beads, buttons, sequins, beads, ribbons;
- photo of the newlyweds;
- artificial flowers.
Let's get started:
- First you need to make cards with invitations, the size of which the envelope will be glued to. Using a simple pencil and a ruler, draw the diagram below on the wrong side of the paper.
- Carefully cut out the templates and fold along the lines. Glue the joints so that the glue does not get on the front side.
- Glue a photo of yourself together to the top of the cover - such an exclusive invitation will remain with the guests for a long time and will remind them of a wonderful wedding celebration.
- If desired, decorate the product with lace, beads, beads and other decorations.
The so-called “lace” cards, where invitation cards are inserted, look elegant and impressive. To make them you will need the following:
- sheets of thick paper/cardboard;
- thin paper;
- ribbons, braid;
- lace;
- stencils for ornament;
- glue;
- curly scissors.
How to make a “lace” card:
- Fold a sheet of thick paper or cardboard in half - this will be the basis for the future cover.
- Process the thin paper using curly scissors - this piece of paper will then contain the text of the invitation.
- Decorate the front side with braid, ribbon, beads, lace (you can use a lace napkin).
- Place your prepared personalized invitation inside.
- On both sides of the card, glue ribbons or ribbons that need to be tied so that the invitation sheet does not fall out.
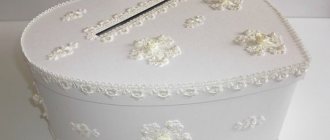
How to make an original wedding gift with your own hands
There are a huge number of ideas for making memorable gifts. If you decide to present the newlyweds with a sum of cash, then you can create an attractive multi-envelope for money, which will be an unusual gift for the bride and groom that will last a lifetime. Moreover, a thing made with one’s own hands is always appreciated. An exclusive gift for storing money will be one of a kind, because it is addressed to a specific young family. A do-it-yourself wedding savings book can be made in the form of:
- Folders that will contain envelopes for banknotes inside.
- An album or magazine, where on each page there will be a monetary theme with mandatory cells for banknotes.
What is needed to make a passbook?
A handmade wedding passbook is an interesting postcard, but with more spacious and interesting content. It can be filled with humorous congratulations, wishes of good luck, autographs, poems or unique photographs. The design can be varied, but when choosing, it is advisable to take into account the following nuances:
- The text design should harmoniously match the theme of the page.
- Symbolic photos and drawings should be selected only with festive content and bright design.
- On each page you need to place an envelope for bills, which can be created from suitable fabric or delicate lace.
Cover design options
When creating a savings book for newlyweds with your own hands, you should decide what design you want to give to the product. If you initially choose a suitable thematic direction, it will be much easier to select materials and combine them with each other, creating an original wedding gift. When making a masterpiece, try to use your imagination to the maximum, be guided by the feelings that you want to express in the gift.
Options for designing a passbook cover can be completely different:
- A folder covered with padding polyester and double-sided tape.
- The cover in the form of an image of a state savings book will also look attractive.
- A popular choice for many needlewomen is the scrapbooking technique, which is often used to create a decorative design for a book for storing banknotes.
How to make?
Products made using the scrapbooking technique look very beautiful and unusual. The essence of the method is cutting out a three-dimensional pattern from thick cardboard.
This technique is not difficult to master. You can watch several master classes on the Internet, practice and start creating a wedding envelope.
Popular articles Interior decor with butterflies
You will need:
- pattern;
- scissors;
- decorative elements;
- pieces of fabric;
- ruler;
- glue;
- pencil.
First, you need to carefully calculate the size of the envelope, make a pattern, mark the location of the hole (standard or on the side), think about the type of clasp and the relief of the sides of the envelope.
Using a pattern, cut out a similar layout from white or colored cardboard. It is better that the material is not too dense, but not “liquid” either, so that the shape holds well, but it is not too difficult to bend along the intended lines. Glue the edges of the envelope using Moment glue.
For decoration, you can choose whatever you consider necessary and find in a craft store: beads, satin ribbons, glitter paper, colorless glue, beads, rhinestones. On the front side of the envelope you can depict wedding rings, and all inscriptions can be made in ink with monograms. The rich decor is ideal for a festive event, and the envelope will look very stylish and elegant.
The decorations that you will make using the scrapbooking technique should be well thought out in advance. This concerns the location of all elements and their appearance. Most often, floral motifs, lace patterns and short congratulatory inscriptions (“Congratulations”, “Happy wedding day”, “Advice and love”, “Happiness”) are used to decorate wedding envelopes. By the way, flowers can be made not only from cardboard, but also from corrugated paper. Such “trembling” material will make the flowers almost alive. To create them, you need to roll a triangular piece of corrugated paper into a cone, and turn the edges outward, imitating flower petals. For fixation, it is enough to use 1-2 drops of PVA or Moment glue. It is advisable to make several identical flowers in one color (white or red) and attach them to the envelope. You can complement the “flower meadow” with lace, sparkles, and decorative stones.
Inside the envelope you can also put a mini-card (purchased or also made yourself) with a short poetic congratulatory text. The donor's signature is welcome. It can be applied in ink using a stencil and decorated with golden glitter.
You will learn how to make a beautiful wedding envelope for money by watching the following video.
Wedding invitations in handmade envelopes
However, the purpose of wedding envelopes does not end solely with serving as just packaging for money. DIY wedding envelopes can be used for wedding invitations. You can make the invitations yourself; you can purchase ready-made ones in specialized stores and fill them out, indicating the invited person, the names of the newlyweds, the date and time of the celebration; You can order invitations to be printed from a printing company.
Tools
In order to create an envelope for a wedding you may need the following tools:
- paper or cardboard;
- scissors;
- glue;
- ruler;
- pencil;
- double sided tape;
- needle and thread;
- spray paint (gold or silver paint is most commonly used)
- watercolor paints, gouache
- tassels.
How to decorate a wedding envelope?
A variety of decorative materials can be used to decorate a wedding envelope. However, the most commonly used are:
- lace (wide or narrow);
- decorative threads of different colors and textures;
- ribbons and bows of different widths;
- beads of various shapes;
- beads;
- feathers;
- buttons;
- felt, cardboard, paper templates (hearts, doves, rings, flowers, butterflies, bows, etc.);
- decorative paper elements made in various techniques (origami figures, quilling).
You should not limit yourself only to the above-mentioned decorative elements, because you can use everything that seems appropriate to you.
How to make an envelope?
Creating a wedding envelope begins with choosing its shape and material for production.
To create an envelope, first of all, you will need a ready-made white envelope (of course, it should not have stamps or any inscriptions on it) or paper/cardboard for its manufacture. The paper can be white or colored, with drawings or ornaments. It is recommended to use fairly thick paper so that the envelope can maintain its shape. You can use an old envelope as a template, you can use a ready-made template, there are a huge number of examples, or you can come up with and create it yourself. The photo shows some envelope patterns that can be used to make a wedding envelope:
For a wedding envelope, as a rule, it is customary to use light pastel colors. The most preferred and most commonly used colors are pink, blue, turquoise, beige, ivory, coffee, gold, silver. However, this is not a mandatory rule, and the color scheme can be much brighter or even contrasting - it all depends only on your imagination and your desire.
It is not recommended to overload the envelope with too many different decorative details. Everything is good in moderation, including decorations. When making an envelope, do not forget about its size. The envelope should not be too large, because such an envelope will simply look out of place, while an envelope that is too small will not fit wedding invitations or banknotes, and they will not be wrinkled.
In the videos below, you can watch a master class on making wedding envelopes. At the same time, it is not at all necessary to completely and completely adhere to all of the specified actions and recommendations. Creating an envelope for a wedding is, first of all, a creative process and, therefore, it is not limited by strict rules, boundaries or prohibitions. The main condition is that working on it should bring you pleasure, and the finished result should please those people for whom this wedding envelope is intended.
Today I want to tell you about how to make an envelope for money for a wedding from paper with your own hands. Thanks to the free templates provided, creating such an envelope is not particularly difficult, and a step-by-step description with photos will explain how to make it correctly.
Wedding envelope in the form of a postcard: option 2
This option for making a wedding envelope is more complex. But with the help of the master class described below and the video lesson presented, even a beginner can handle it.
- Cut a rectangle measuring 21 cm by 19 cm from thick paper.
- Mark the fold lines on the sides so that the middle is 8 cm, and the sides are 6 cm and 7 cm.
- Press the lines with a needle or scissors and bend both edges towards the center.
- Make a fold for gluing. To do this, place the workpiece with the side 19 cm from the bottom.
- Measure 1 cm strips along the sides of the rectangle.
- Cut them off, but only in two parts (one edge and the middle). There should be a sealing strip on the third part of the envelope. Its inner edge must be cut at an angle.
- Also press the fold line with scissors and roll it up.
- Now you should decorate the inside of the envelope. At the bottom of the blank, you can use a special stapler to make a semicircular hole for more convenient removal of the contents of the envelope.
- The upper part of the workpiece can also be made in the form of a larger semicircle, using any round object as a stencil.
- The edges of the envelope can be processed with a figured hole punch, if available.
- Next, you can move on to the external decoration of the envelope. Cut out templates from beautiful paper that correspond to the dimensions of the sides of the workpiece and glue them to the cardboard;
- Make a mount for the envelope. Cut a strip of paper 21 cm by 2 cm;
- Bend the strip into three parts so that the envelope fits into it;
- Secure the holder using any decorative element: a ribbon bow, a fabric or paper flower, etc.;
- Decorate the envelope to your liking.
Master class on creating invitations using the scrapbooking technique with your own hands
This option is suitable for the laziest designers. Buy ready-made cards and use them as invitation templates, make your own bows from satin ribbon and glue them on, or stick on a pattern of beads or bugles. You can also make holes in the invitation and thread the ribbon through them. The postcard will become original and unique, and you won’t need much time to make it.
Most newlyweds, when choosing how to make wedding invitations, turn to the scrapbooking technique.
Necessary materials:
- thick paper;
- hole puncher;
- scissors;
- satin ribbon;
- lace;
- glue.
Type the text of your invitation on your computer and print it on thick paper. Cut out a rectangle measuring 9 cm by 13 cm with curly scissors. The color of the paper can be any, choose it in accordance with the theme of your wedding.
At the top of the sheet, in the middle, use a hole punch to make a hole.
From thick paper, as shown in the picture, bend the envelope and glue the edges with glue. The color of the envelope can be the same as the invitation, or contrasting.
Thread a satin ribbon through the hole on the invitation and tie it with a bow.
Use glue to attach lace to the left side of the envelope and a bow to the center.
We admire the beauty.
Another way to make an invitation with a satin ribbon. This option is more labor-intensive and will require perseverance and patience from you.
Necessary materials:
- thick white or colored paper;
- Double-sided tape;
- designer cardboard;
- scrapbooking paper;
- satin ribbon at least 1.3 cm wide;
- beads, pearls, flowers for decoration.
Detailed step-by-step instructions will help you complete this invitation.
Choose the templates you like on the Internet and print the invitation text on white paper, and the front side of the card on colored paper.
Cut out a rectangle of scrapbooking paper identical to the size of the front of the card. Glue tape onto scrapbooking paper as shown in the photo. Glue the satin ribbon onto the tape, leaving allowances of 1.5-2.0 cm on the sides. Turn the paper over and secure the ends of the tapes on the wrong side, gluing them to double-sided tape. Cut about 15 cm of satin ribbon. Glue a piece of double-sided tape (about 0.5-1.0 cm) to one edge of the tape.
We roll the tape into a ring and secure it with double-sided tape. Glue a piece of tape inside the ring, to the place where the ring is glued. Glue the ring in half and get a bow. Glue tape to the back of the bow (approximately 2.0-3.0 cm). Glue the bow to the center of the ribbon (you can use a ruler to determine the middle). We cut out a rectangle measuring 14.3 cm by 33 cm from designer cardboard. Fold the resulting blank in half. Paste the invitation text on the right side. Place tape on the inside of the invitation with the text.
Glue the top part of the invitation to the base. Place tape on the bottom part (the one with the tape). Glue the lower part onto the workpiece, making an overlap of about 1 mm to hide the joint between the parts. Decorate the resulting invitation to your taste (for example, with beads and a flower).
Necessary materials
The next step in creating a gift envelope will be the selection of the necessary materials and tools. Of course, the list of materials and tools will vary depending on the complexity of the envelope being created. However, for the basics there is a specific list that will be presented below.
Among the necessary things you can find:
Glue, scissors, stapler and other fastening elements, this can be: double-sided tape, a glue gun or a glue stick.
Of course, we must not forget about the ruler, pencil and eraser.
The basis for the envelope can be: colored paper or cardboard, pieces of beautiful wallpaper, gift wrapping, felt, corrugated paper and other materials of this type.
Popular articles Complex two-story flower
As decoration elements, you can use everything that your imagination allows, this can be: beads and buttons, ribbons, beautiful lace, both paper and fabric, sequins, sparkles, straws, artificial flowers, etc., etc.
You will also need a spacious, well-lit work surface, and it is also worth remembering that the materials that will be used in the process of creating envelopes must be kept at hand.
How to make an envelope out of paper
Most wedding envelopes are made of paper. Some people prefer to use cardboard for this, but thick paper does not bend as comfortably as required to create beautiful, smooth lines. Therefore, preference should always be given to paper as the basis for crafts. If you use colored paper for these purposes, you will encounter the problem of its thinness. To seal colored paper, first glue it onto a sheet of white stationery paper. Next, continue creating the envelope.
Original wedding envelope templates will help you make exquisite crafts for all occasions. Choose the shape you like and fold the envelope according to the photo instructions. In such paper crafts, there is enough space inside not only to place a monetary gift, but also to write your congratulations on the inner wall.
Options for envelopes for money
When choosing a suitable envelope for money for a wedding, keep in mind that it must correspond to the scale of the event. Openwork, satin details, voluminous hearts, images of doves, as well as inscriptions: “Happy wedding day”, “Happiness and love”, etc. are welcome. It is also acceptable to use humorous advice on how to subsequently manage the donated amount: “Go on a trip around the world” , “Useful for my daughter or son,” “For diapers/vests.”
Along with the banknotes, you can put a gift certificate in the envelope for a joint visit to the SPA center, a concert of your favorite musical group, or a romantic weekend in a country hotel.
What could be the design on the envelope:
- a bouquet of luxurious roses;
- lace and bows;
- flowers with wedding rings;
- cute kitten with a gift in its paws;
- box with hearts;
- colorful balloons;
- cartoon image of a bride and groom;
- tuxedo and wedding dress.
To make a simple envelope for banknotes, print the version you like from the Internet and cut it along the outline. Fold along the dotted folds and glue the two sides together. You can choose an option with a pattern or additionally decorate it with beads, ribbons, lace or other decoration.
Examples of wedding options:
- Envelopes-wishes “Savings book”. Consists of several sheets of hard paper with drawings and pockets for money. Each piece of paper is dedicated to a specific purpose for which money is given: travel, addition to the family, new car, etc.
- Wooden envelope. This unique handmade item with carved patterns is designed for inserting banknotes of any denomination.
- A product made from designer paper with a variety of wedding decor.
- Postcard-envelope. An invitation lettering is applied to the inside, and the sides are folded and tied with ribbons.
Adviсe
To create an unusual wedding envelope, you must take into account recommendations from professionals.
To make an envelope, it is better to choose paper and cardboard in light colors. Patterns can be applied to the surface of the product using ink, paint or gel paste. With a hole punch you can make figures of angels, butterflies, flowers and others. They should be knocked out from decorative paper. They are fixed on the front side of the product with a glue gun in any order. In order for the upper opening part of the envelope to acquire its original shape, you need to use decorative scissors with a wavy edge or a border. Lace patterns are also obtained through the use of designer scissors. To decorate the front of the envelope, you can use photos of the newlyweds, their relatives and friends.
It is important that the photographs are printed on regular paper and not photo paper. The latter will make it difficult to decorate photographs.
Wedding envelope using scrapbooking technique from a finished blank
In order to make a beautiful wedding envelope, you don’t have to make it yourself. You can use a ready-made package and decorate it to your liking. The master class below will tell you in detail how to do this.
- Take a ready-made envelope of the desired color.
- Place a piece of lace in the center.
- Glue fabric flowers along the edges of the envelope.
- Cut a heart out of fabric and attach it to the lace.
- Sew several small buttons onto the heart.
- Decorate the envelope with rhinestones and sparkles.
This is just one of many options for decorating a wedding envelope using the scrapbooking technique. You can also use other materials at hand: beads, feathers, ribbons, pictures printed on a printer, etc. Young people can make such an envelope to place an invitation to a celebration, and guests can use it as an addition to a cash gift.
Elements of the image of the bride and groom
Wedding accessories for the bride and groom are no less important than the outfit. Similar elements can also be made using needlework.
Jewelry for the bride (jewelry, tiara), made with your own hands, will highlight the style of the bride, giving her a special charm. What and how to do?
It's easy to make a necklace using seed beads, seed beads, or even satin ribbons. It is also possible to use various small wedding accessories from the bride’s maiden box. It is better to use high-quality fittings so that the jewelry looks stylish and rich. Jewelry should be in harmony with the bride's outfit, and also match the theme of the wedding.
You can make your own tiara, a basket for rose petals, or a small bride’s handbag.
A boutonniere is considered an integral element of the groom’s image, which is also easy to make with your own hands. Important advice: this decoration should be in the same style as the bride’s bouquet and in the same color. For this purpose, compositions of fresh or artificial flowers, or porcelain flowers can be used. A porcelain boutonniere will look impressive and will retain its original appearance throughout the day, unlike decorations using fresh flowers.
How to make your own boutonniere, watch the video master classes:
Features of choice
The appearance of the product should correspond to the holiday: be pompous, with openwork and satin details, beads, voluminous hearts and doves, contain the inscriptions “Happiness”, “Love and mutual understanding”, “Happy wedding day”, comic advice on how to manage the amount ( for example, “Make your old dream come true,” “Tell it to your daughter and son”) and more.
Anyone can make an original handmade envelope. The main thing is to have a little diligence and time. Such an unusual gift will not go unnoticed by the newlyweds and guests of the holiday. You can design the product at your own discretion, borrowing interesting author’s ideas from one of the thematic forums or coming up with something of your own. On a product made by yourself, you can put the names of the newlyweds or simply initials enclosed in hearts, and they will know for sure that you made this holiday accessory exclusively for their celebration.
Popular articles DIY New Year gift ideas for 2022
The edges of a handmade envelope can be made not straight, but wavy, and voluminous decorations can be added to the front side - this will add romance to the product. In color design, you should focus on pastel colors: pink, soft blue, sand, white.
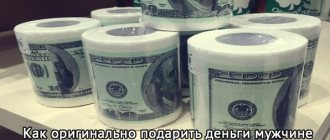
How can you replace a gift envelope at a wedding?
If someone takes the position that a wedding gift envelope cannot be replaced with anything, then such people are very mistaken, because gift wrapping can be replaced with boxes, bags and other interesting details.
For example, instead of an envelope, bills can be folded into a small box, wrapping the bills in a tube or folding them neatly and not tightly.
If you pack banknotes in a small gift bag, then the most practical option would be to attach such a bag to a bouquet or other gift. Thus, the banknotes in the gift bag will complement the main gift. Accordingly, if money is not planned to be given as the main gift, then it should not be packaged in this way.
Gifts for any holiday and celebration, including a wedding, are always interesting and beautiful. Exquisitely designed and correctly selected gifts are pleasant not only to receive, but also to give, and money placed in a pleasant and suitable package, in this case in a gift envelope, will not be an exception.
Despite the fact that the package will contain banknotes, the design of the gift will be done with your own hands, which means that sincerity and a real relationship with the couple to whom this gift will be presented will be invested.
Wedding wish tree – original design ideas
A wedding wish tree cannot be called the main attribute, but it adds charm and grace to the atmosphere. If the area of the banquet hall allows you to place an extra table, on which a shiny tree, decorated with decorative elements and bright leaves, will flaunt.
Some young people believe that a book is ideal for making wishes, others are inclined towards an album or not to create trouble for themselves by simply buying a special album for this purpose. Young people who prefer chic and brilliance in everything will be happy to offer guests such a fascinating way to describe their thoughts.
Original design of a wish tree
No less interesting is the option of a drawn tree on a large sheet of paper. To do this, draw a large tree with many branches, but without leaves. The leaves will be the imprints of the guests, on which they will leave pleasant and affectionate words. It would be nice if those invited leave a signature under their wishes.
The tree of wedding wishes can be hung on the bedroom wall in a frame - let it be the first decoration of your common home.
To create a wish tree with your own hands you will need:
- A3 paper;
- stamps of different shapes;
Editor's choice: How to live happily - the “formula of happiness” - does it exist?
- multi-colored gel pens;
— an interesting frame for the paper size;
- wet wipes.
The photo shows colorful and elegant design options for the wish tree.
If one of the young people has artistic talents, drawing a lush tree will not be difficult. But what if you don’t have enough time for drawings? To do this, you can download the A3 templates with a flick of the wrist. The resulting drawing will only have to be signed - the wedding date and the names of the heroes of the occasion, and put in a frame.
Options for creating a holiday tree
A wire wish tree will become noticeable and large-scale. The main thing is to paint over the wire, giving the wood some piquancy.
How to make such masterpieces that guests would want to leave their wishes on it? Everything is easy and simple, a minimum of material and time, but a maximum of delight.
Interesting ideas
Today it is very fashionable to hold weddings in Provence style. The wedding envelope can also be made in accordance with the theme of the celebration.
Style Features:
- pastel shades (cream, lilac, white, light blue, soft green);
- floral patterns;
- lace elements;
- inscriptions with monograms and curls;
- sprig of lavender.
The base is an envelope made as described above. Lace is attached to the front side of the product. The envelope is tied with twine, and dried lavender is attached in the place for the traditional bow.
If you have very little time to make an envelope, you can buy a floral print and completely decorate the cardboard surface. The task can be simplified even more if you make the envelope not from ordinary cardboard, but from designer cardboard. Cardboard with a geometric pattern will look original. It will not require additional decorations - just a short congratulatory inscription will be enough. If desired, you can decorate the upper opening part of the envelope with flowers and beads. It is recommended to use a glue gun to fix the elements.
A money envelope for a wedding with a butterfly will look very gentle. The envelope is made from designer cardboard using the method described above. You will need another sheet of cardboard to wrap the envelope. You need to draw a fairly large butterfly (size can vary from 5 to 8 centimeters). Also make contours inside along the wings. First, cut out the shapes along the outer contours, and then with a sharp stationery knife along the inner ones. The result is an envelope with a voluminous butterfly. On both sides of the butterfly, cut two wide strips (about 2 cm wide) from the cardboard “wrapper” and glue them together. The butterfly can be decorated with one or several matching beads.
You can make an original postal envelope with your own hands. To do this, use medium-density cardboard. One side of the future envelope is cut out of it. The cardboard pattern is applied to decorative paper (for example, metallic or for decoupage), outlined and cut out. The cut out part is inserted into the postal envelope, fixed with a glue stick. The front side of the envelope can be decorated in any way you choose.
For those who really want to invest a part of themselves in creating a wedding celebration, but do not like creative work, we can recommend making a simple wedding envelope. The basis is a ready-made envelope purchased in advance. A proportionate piece of decorative paper is glued to the front side (it could even be wallpaper) or an abstract geometric pattern is applied using transparent glue and glitter. Any congratulatory inscription, pre-printed on a printer, is attached to the top: “Sea of Love”, “Happy Wedding Day”, “Happiness to the newlyweds” or others. The envelope is decorated with beads in the color of decorative paper and floral elements.
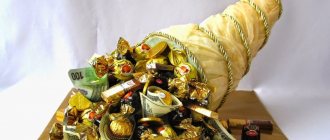
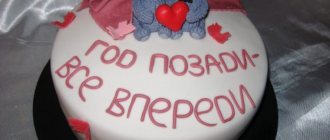
Money cake master class
A money cake is a great way to not only present the newlyweds with money, but to do it in an original way. You can have everything you need to make it at home, you need:
- one hundred small bills;
- thick cardboard, preferably white;
- satin at least 2 cm wide, about 2 m long;
- paper clips;
- Double-sided tape.
We will make three tiers. Step-by-step instruction:
- take cardboard and cut out three circles with diameters of 30, 20, 10 cm;
- for each tier we cut out strips of the appropriate length, the height of a bill (we will attach banknotes to them);
- Using double-sided tape, glue a strip for banknotes vertically to the base of the largest circle;
- Next, we roll the bill into a tube, secure it with a paper clip and attach it to the first tier of the cake;
- We carry out the same manipulations with the remaining circles;
- we put tiers on top of each other;
- We make a beautiful large bow from satin and attach it to the top of the cake.
An original wedding gift for newlyweds is ready! This craft looks unusual and luxurious in appearance, and can also complement wedding decor.